All about stylist Management New Features
We have New Added Features for Stylist Management, here are as follows:
-
Change Stylist by Skill.
-
Change Stylist history can be seen on notes.
-
Update bank information for Stylist Account.
-
Create/Edit Stylist Color Coding on Stylist Schedules.
-
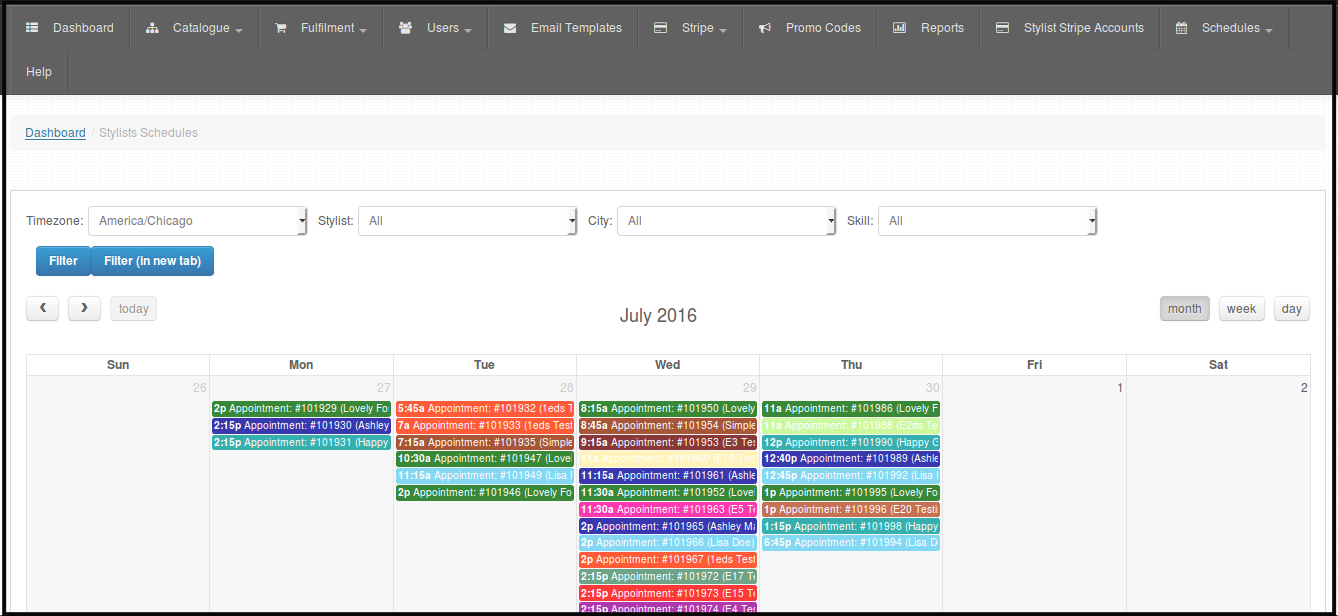
Stylist Schedule Management. Stylist work schedule and Stylist Unavailable schedule can now be created/edited or deleted via Admin Web Dashboard.
-
Stylist Ratings can now be seen separately.
-
How to view Stylist Addresses and Default Address.
-
Stylist Radius information can now be seen via Stylist Coverages and Stylist Default address.
- Change Stylist by Skill.
- Change Stylist history can be seen on notes.
- Update bank information for Stylist Account.
- Create/Edit Stylist Color Coding on Stylist Schedules.
- Stylist Schedule Management. Stylist work schedule and Stylist Unavailable schedule can now be created/edited or deleted via Admin Web Dashboard.

- Stylist Ratings can now be seen separately.
- How to view Stylist Addresses and Default Address.
- Stylist Radius information can now be seen via Stylist Coverages and Stylist Default address.
How to Change Attending Stylist of a Certain Appointment by Skill
-
Stylist of each order are randomly selected by the system. Sometimes we have customers who are requesting for a certain stylist or when our stylist have some emergency we will need to change the stylist attending to a certain appointment. Here is how to change attending stylist.
-
First, log in using your Admin credentials.
-
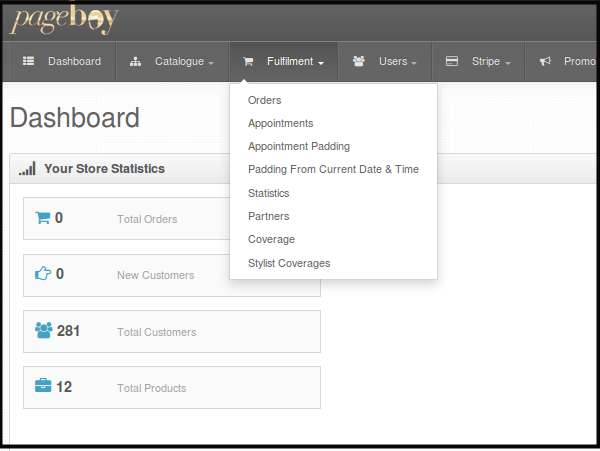
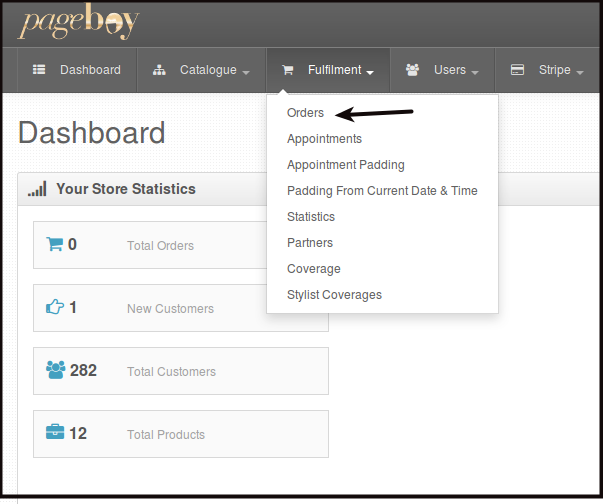
Click Fulfillment.
-
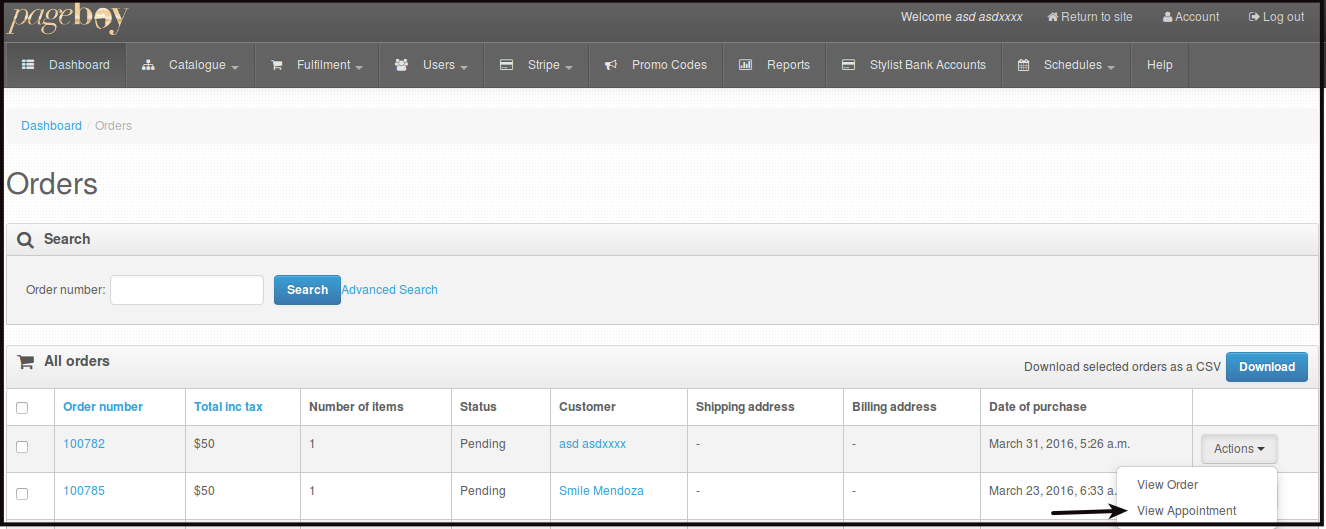
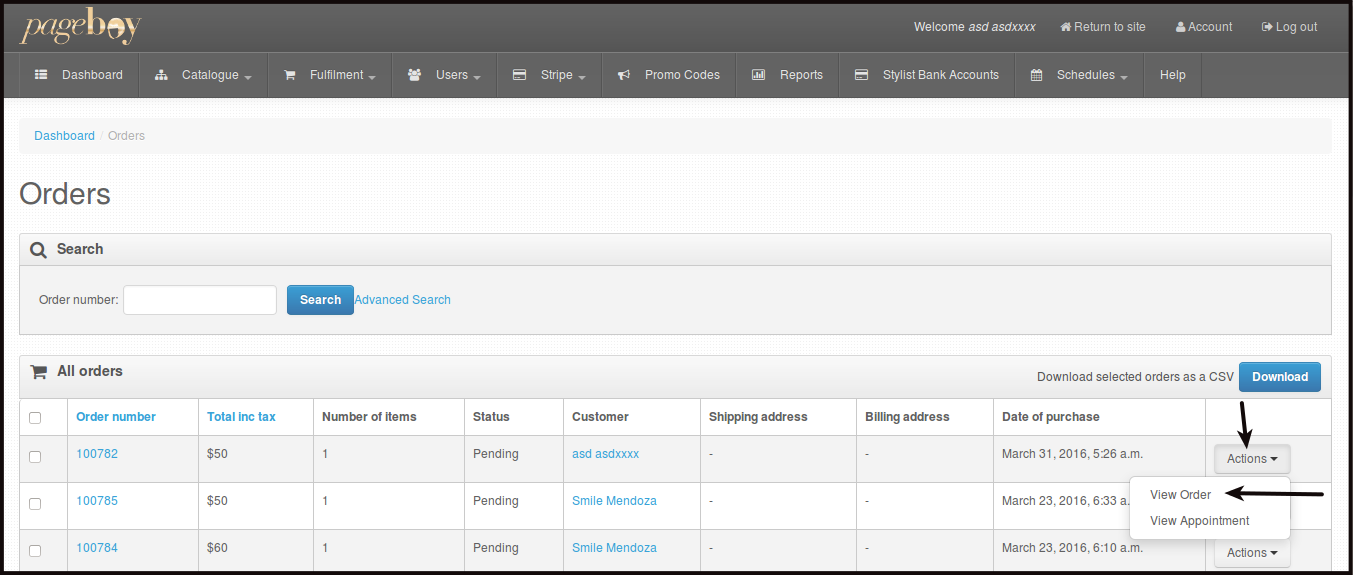
Click Orders.
Then you will be directed to this page.

-
Click Actions beside the order number you want to check the appointment.
-
Click Change Stylist.
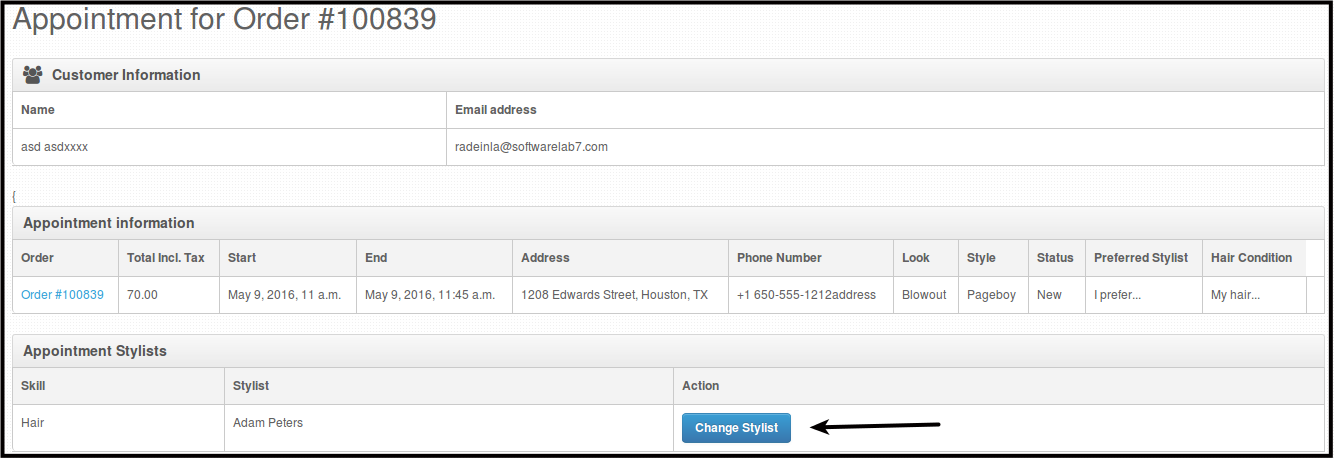
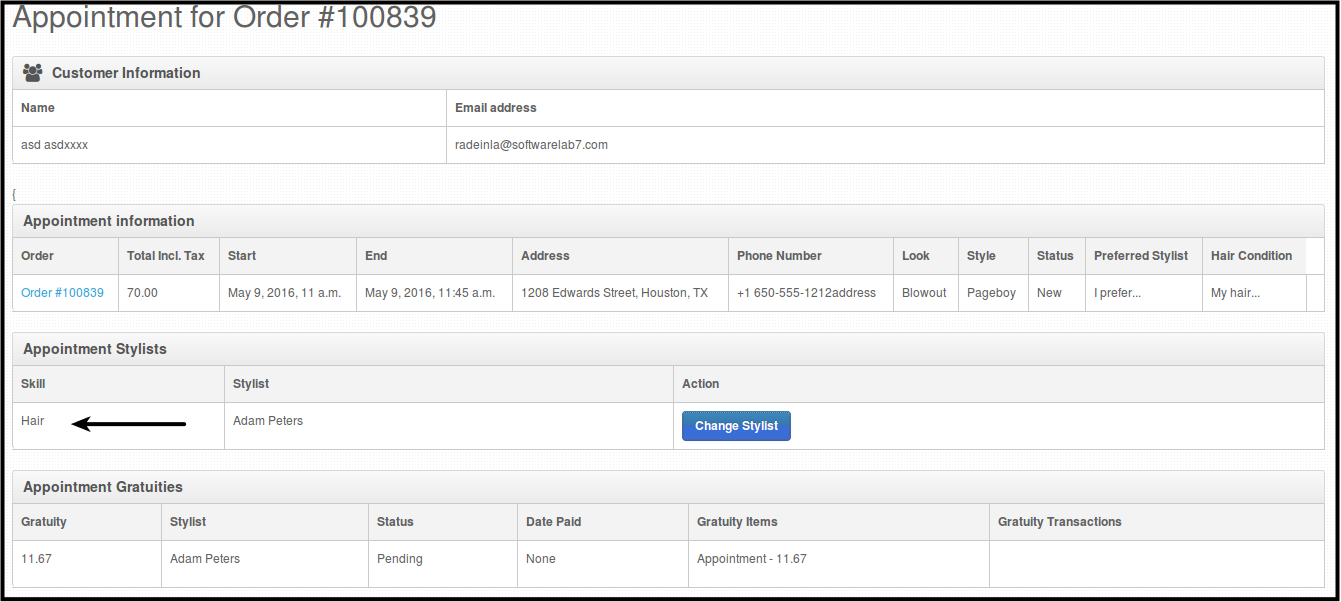
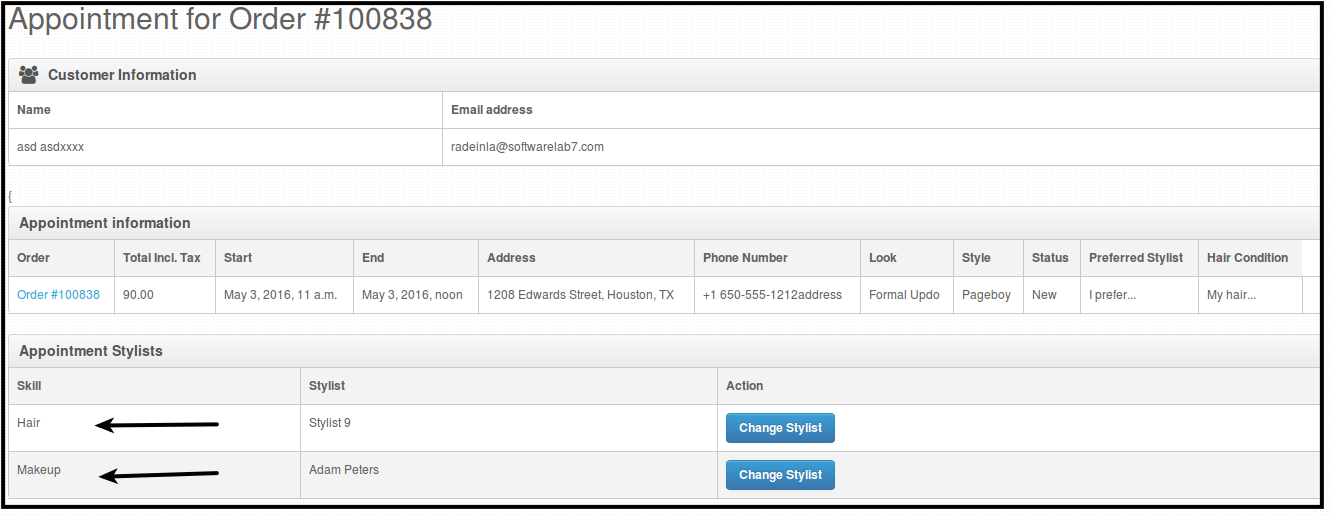
You will be directed to this page. As you can see below, the current stylist name and details are listed on the page so that you can see who is the current stylist, appointment details, and the skill of the stylist.
-
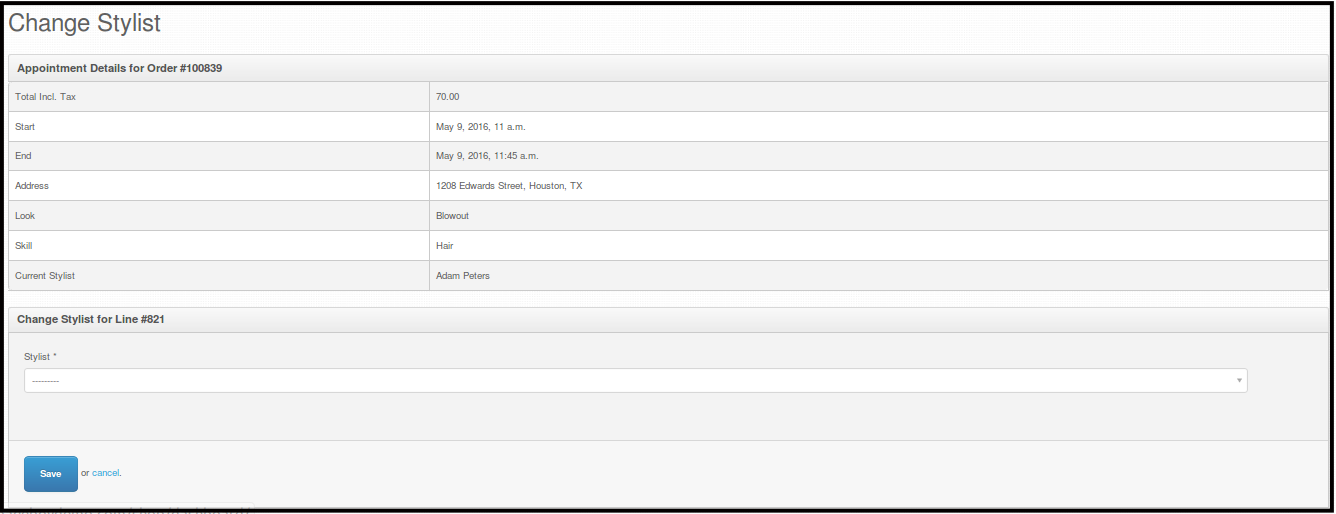
Click Stylist. You will see a drop down of all the stylist available for that time and date. The name of the current stylist is listed below as well for your reference.
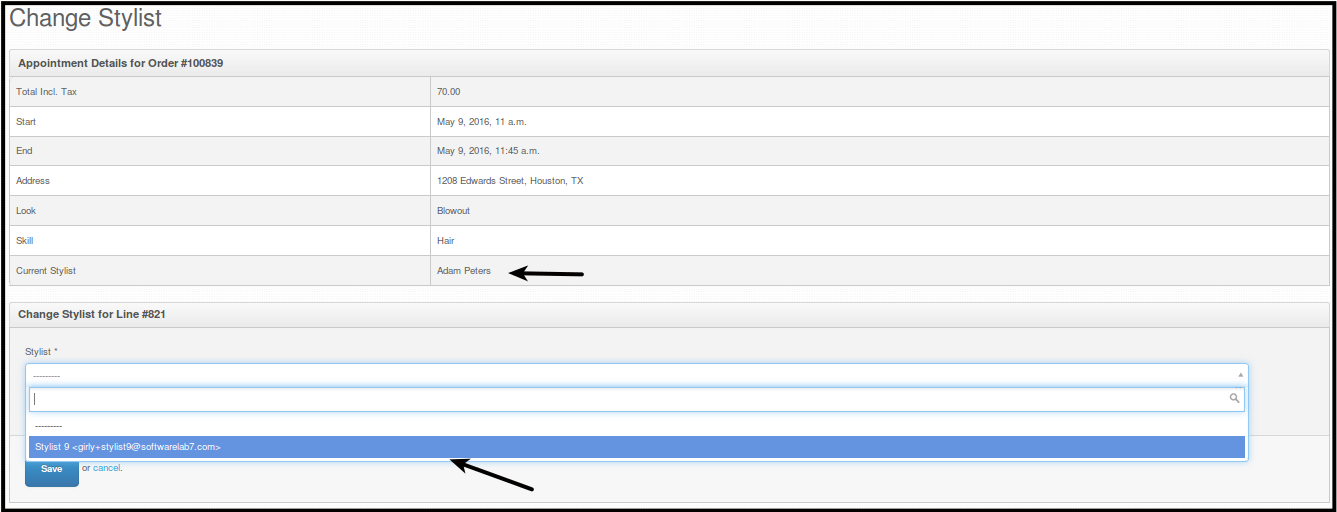
Note: The list of names you will see on this dropdown, are the stylists who don't have any appointment at that date and time of the order. If there are none, it just means that all stylist have an appointment at that time.
-
Click the name of stylist, then click Save to change the stylist.
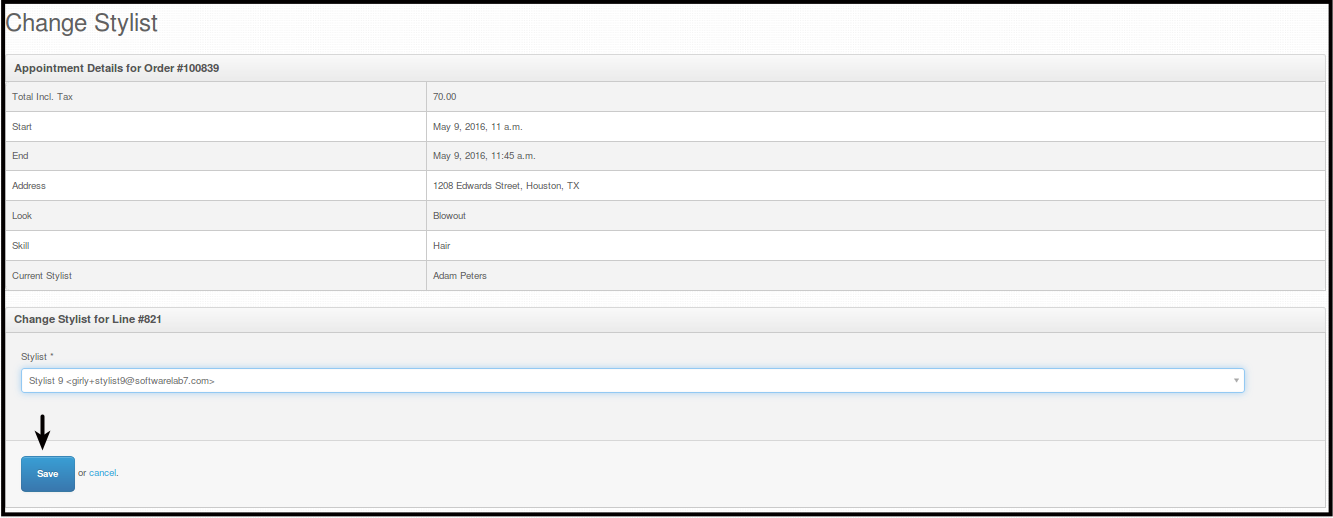
You will see a confirmation that the stylist was changed. From Ashley Maine to Test Testing.

-
How to see Stylist Change History
-
First, log in using your Admin credentials.
-
Click Fulfillment.
-
Click Orders.
Then you will be directed to this page.
-
There are 2 ways on how you can view Order Details of a specific order you want to check.
- Click the Order Number.

- Click Actions beside the order number you want to check, then click View Orders.
-
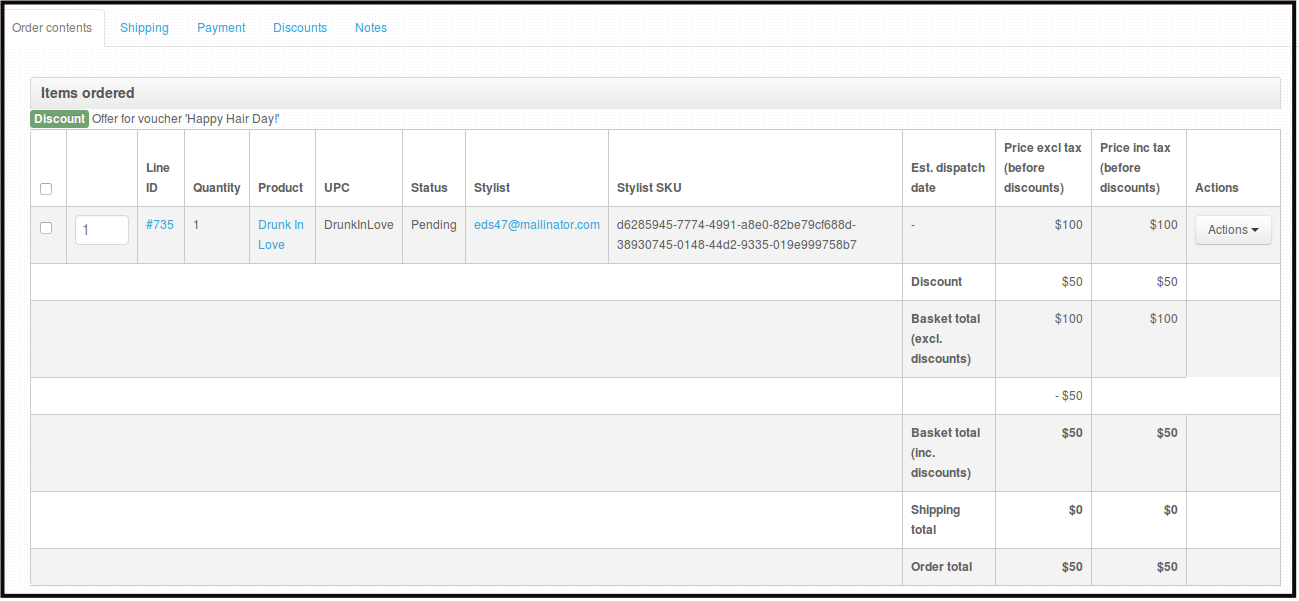
Any of the two ways will direct you to this page. Here you can see the complete order details of the specific order.
- Customer Information - This is where you will see customer's name and Email address of the person who ordered the service/product.

- Order Information - This is where you will see the total price of the order, date it was purchased, time it was purchased and its status.

- Order Details - This is where you can see the price of the product/service, if there are any promotions used by the customer and total amount paid by the customer.
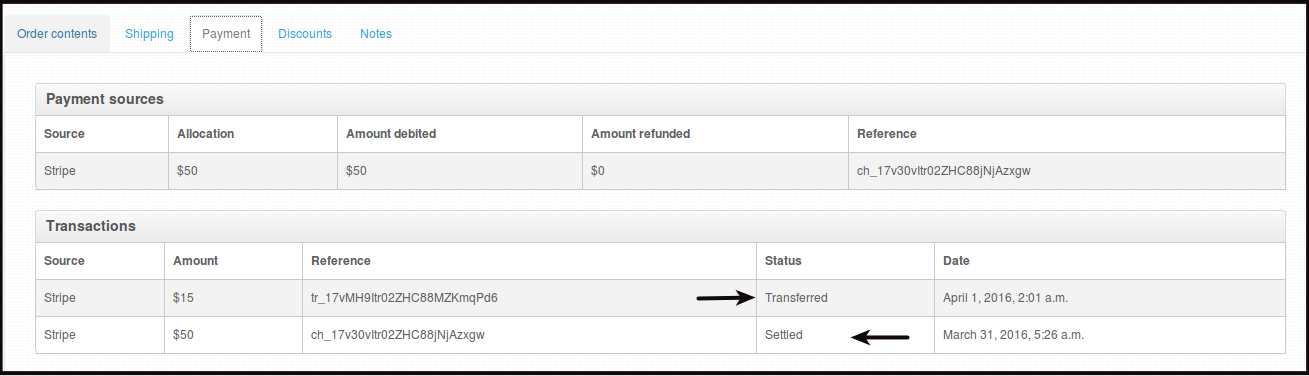
Payment tab will show payment transactions. The Amount Transferred is the money being transferred to the Stylist. The Amount Settled is the money paid by the customer.
Discount Tab will show you what promotions is or was used by the customer if there are any.

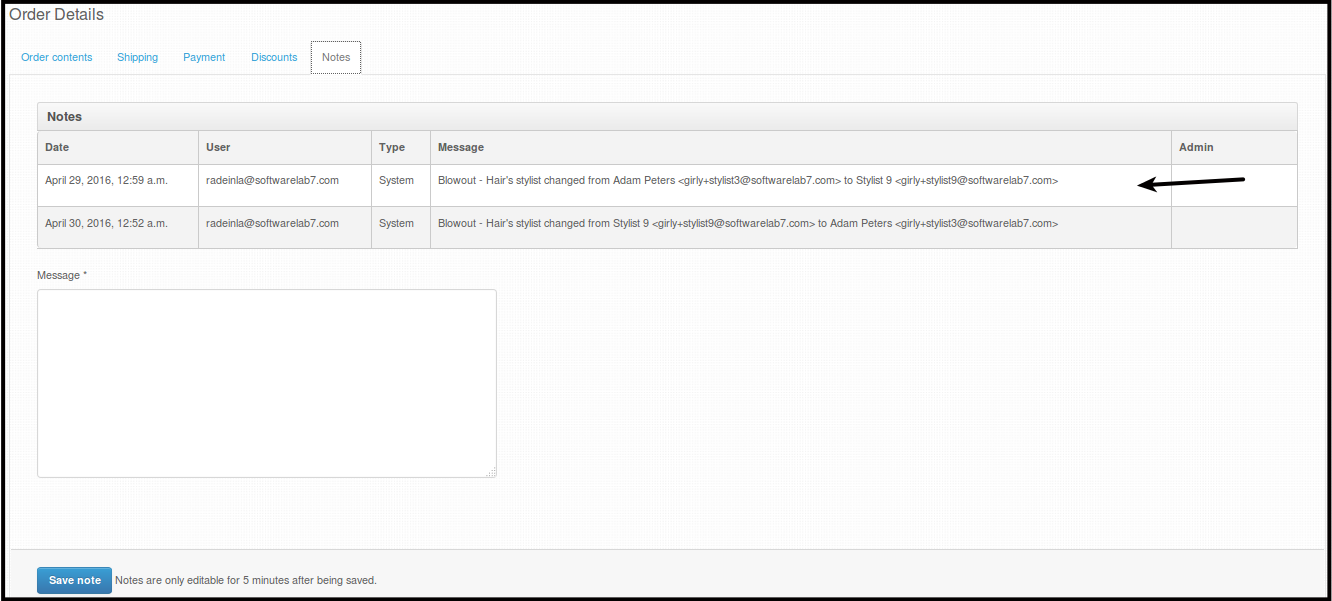
Notes Tab this is where you will see any notes regarding the order and the change of stylist made on the order every change will be listed here, you can also add a note about the order or the change of stylist on this page.
NOTE: Please be reminded that after 5 minutes, any notes that is put on this tab will be a permanent note on the order.
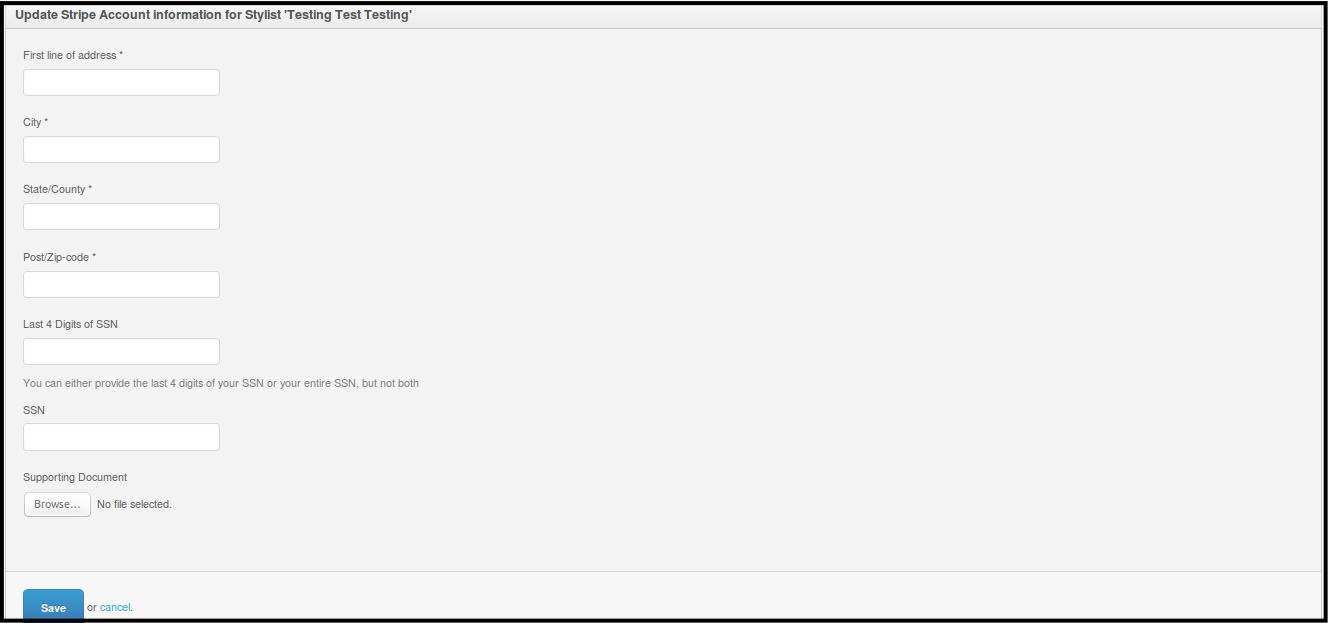
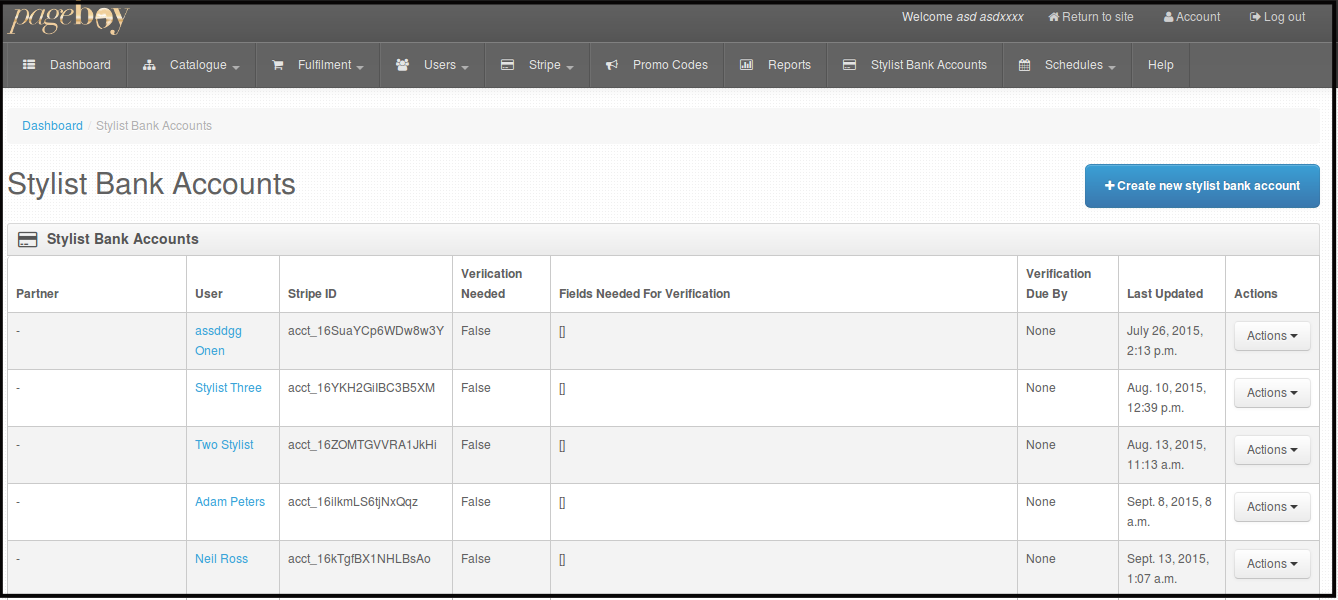
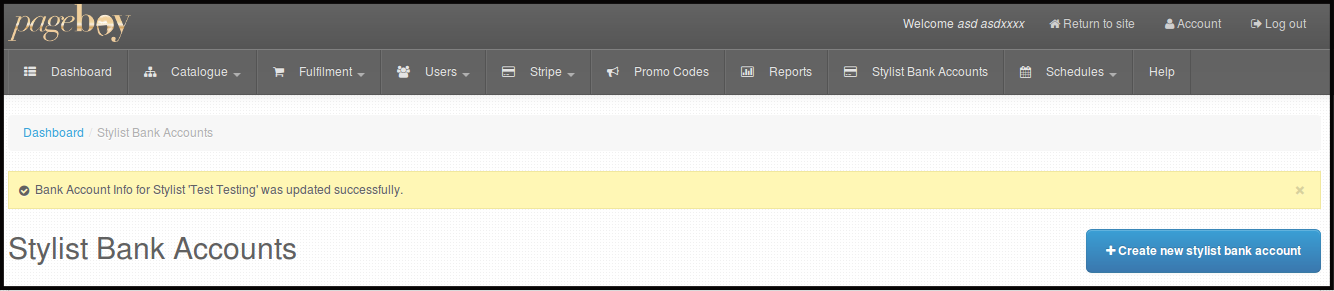
How to Update Stylist Bank Information
Updating Stylist Bank Information is used for bank account authentication for our stylist bank accounts, so that we can transfer their payments without any concerns.
-
Click Stylist Bank Account.

You will be directed to this page.
-
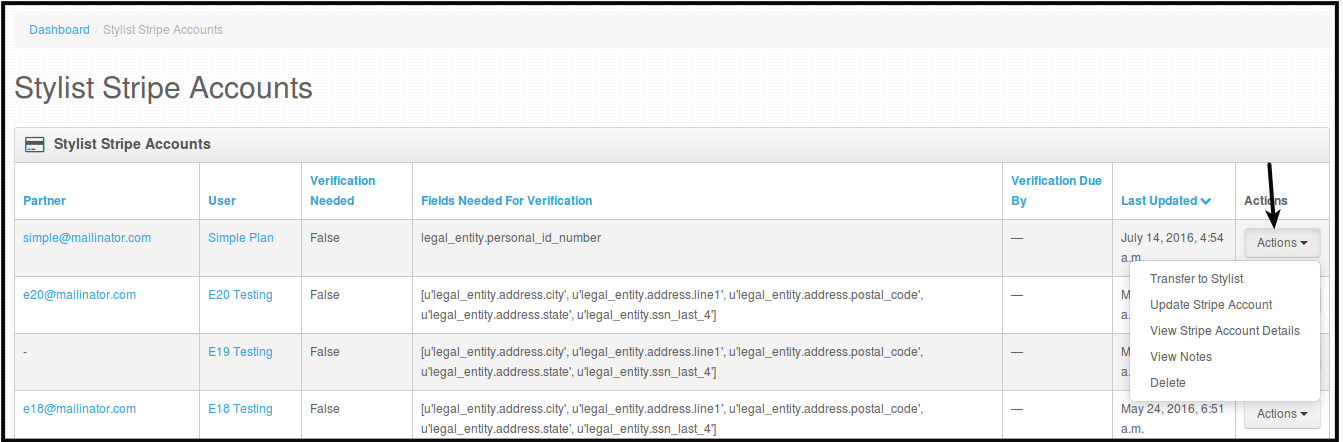
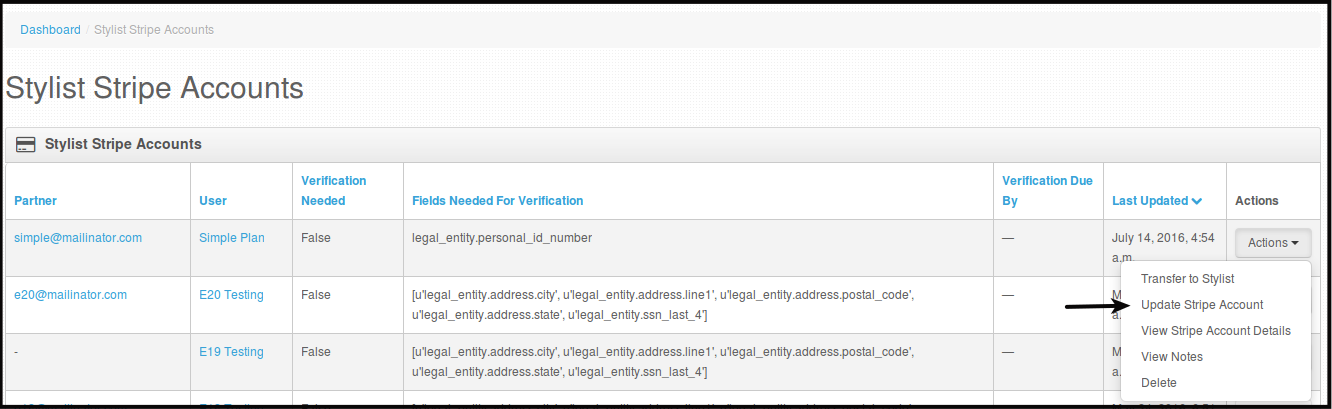
Click Actions.
-
Click Update Bank Account.
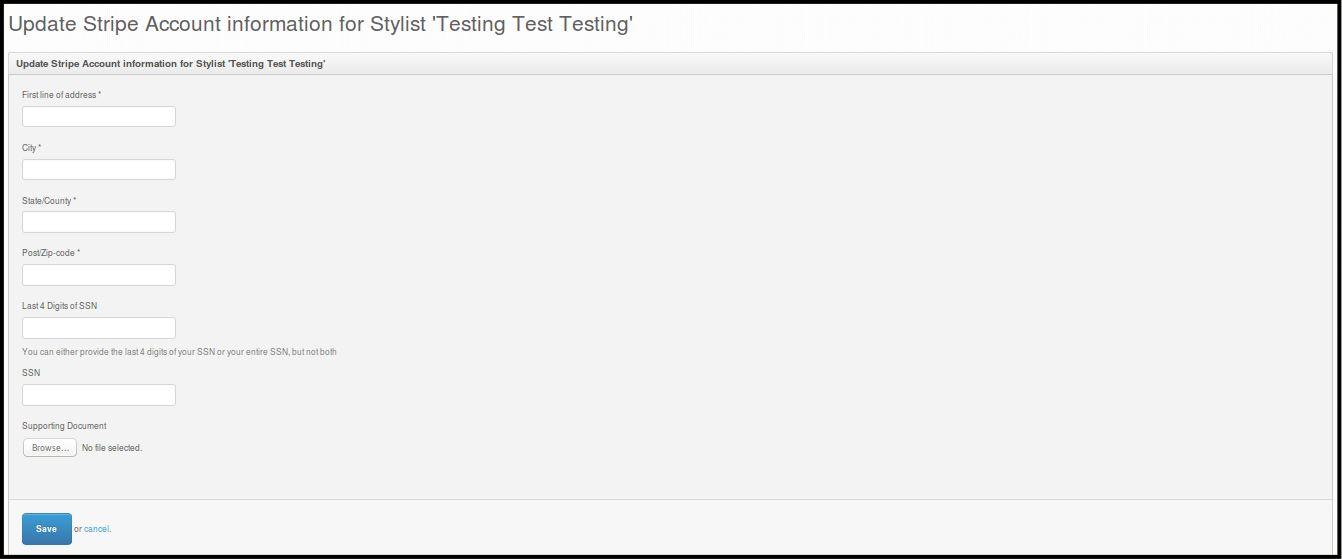
You will be directed to this page.
-
Fill out the form with the new bank account the stylist have, then click Save.
Confirmation will be seen.
How to View Stylist Bank Information
-
Click Stylist Bank Account.
You will be directed to this page.
-
Click Actions.
-
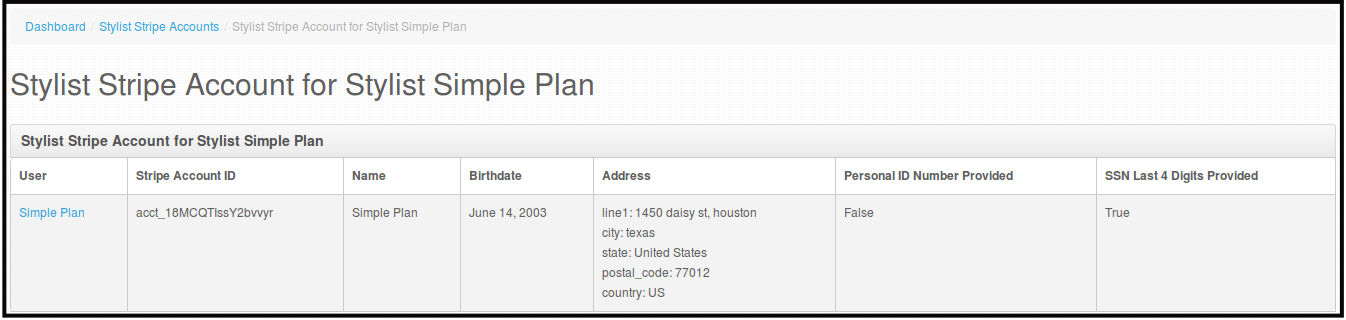
Click View Stripe Account Details.
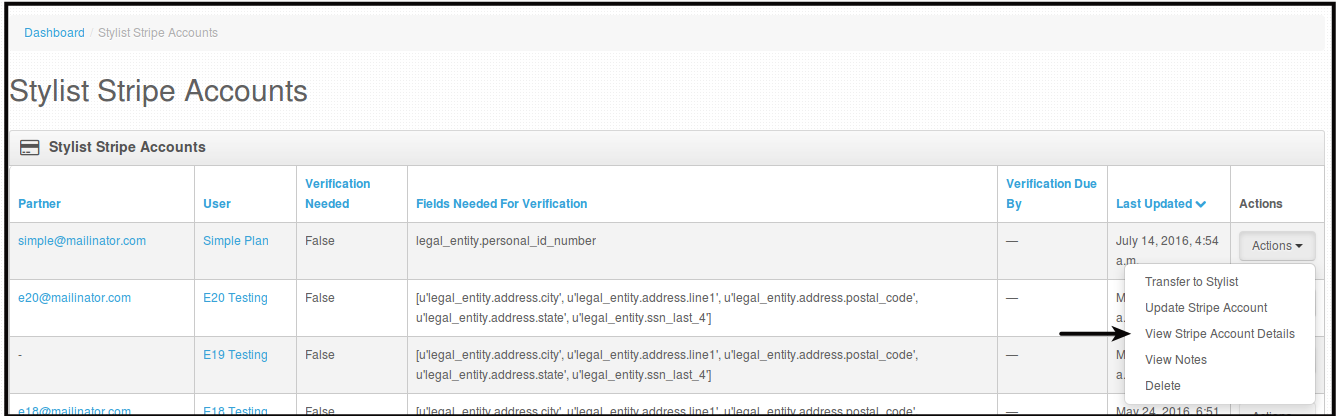
You will be directed to this page.
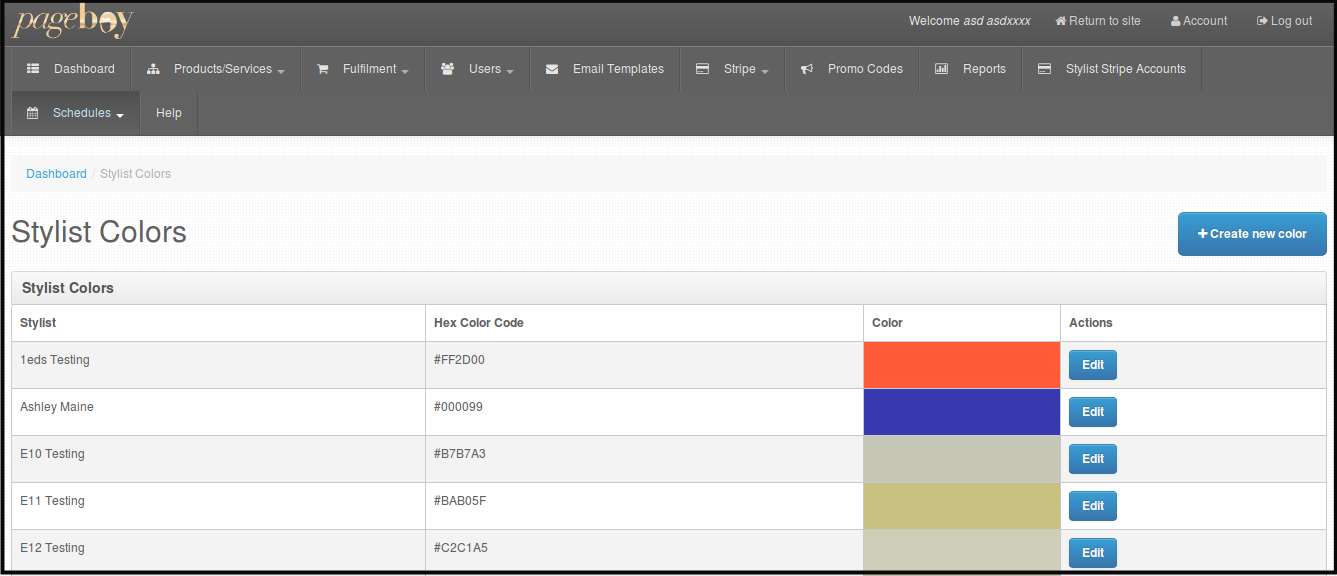
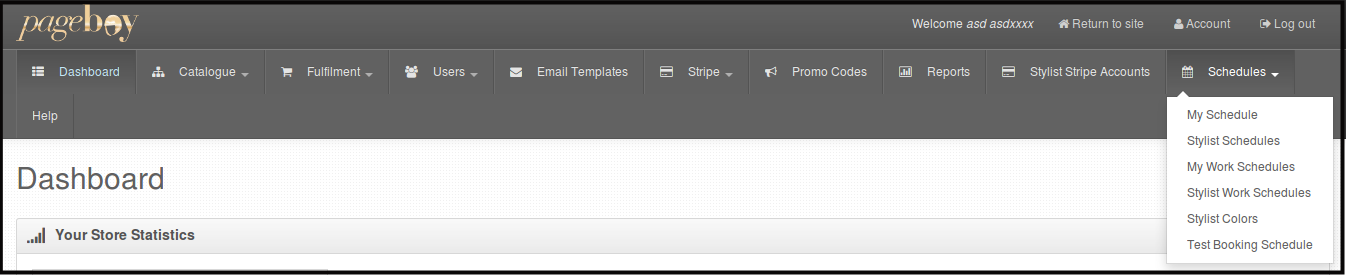
How to Create Stylist Color
-
Click Schedules.
-
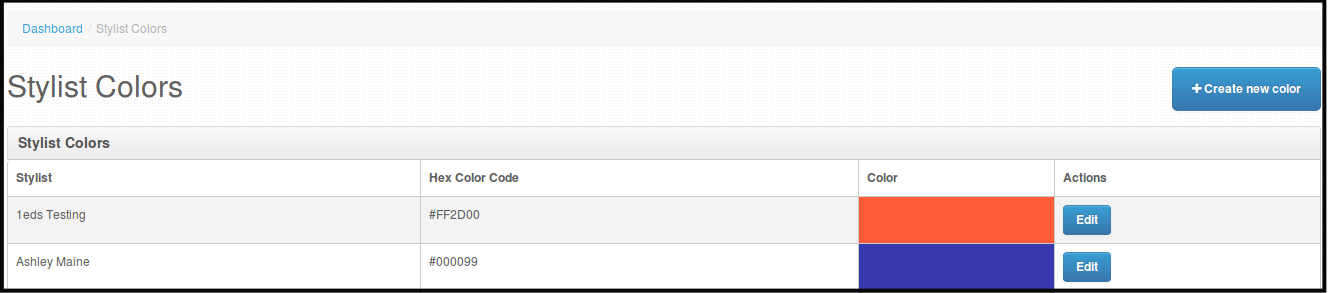
Click Stylist Colors.

You will be directed to this page.
-
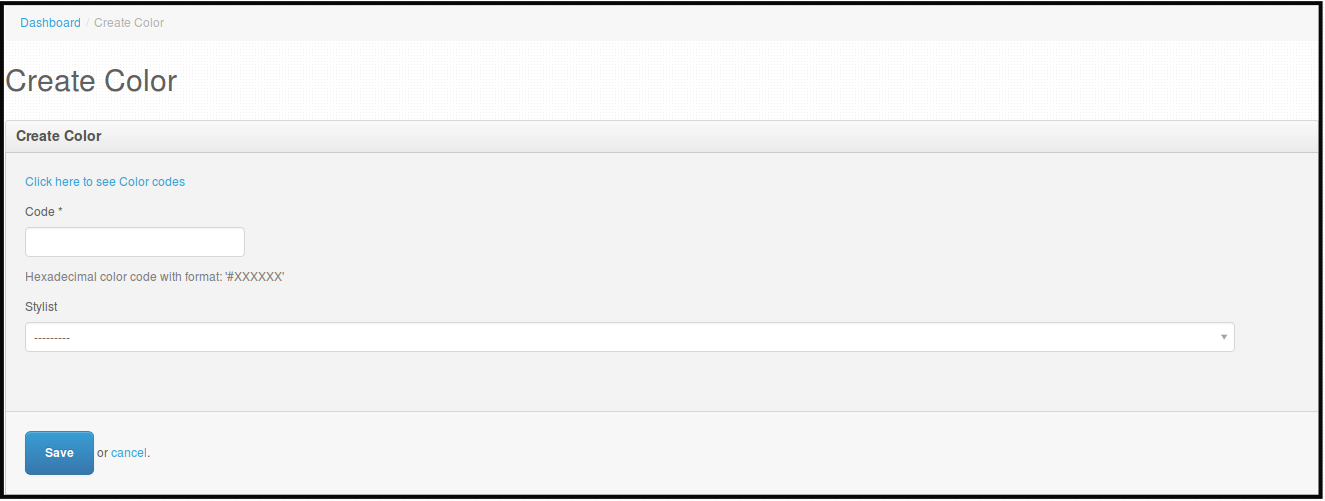
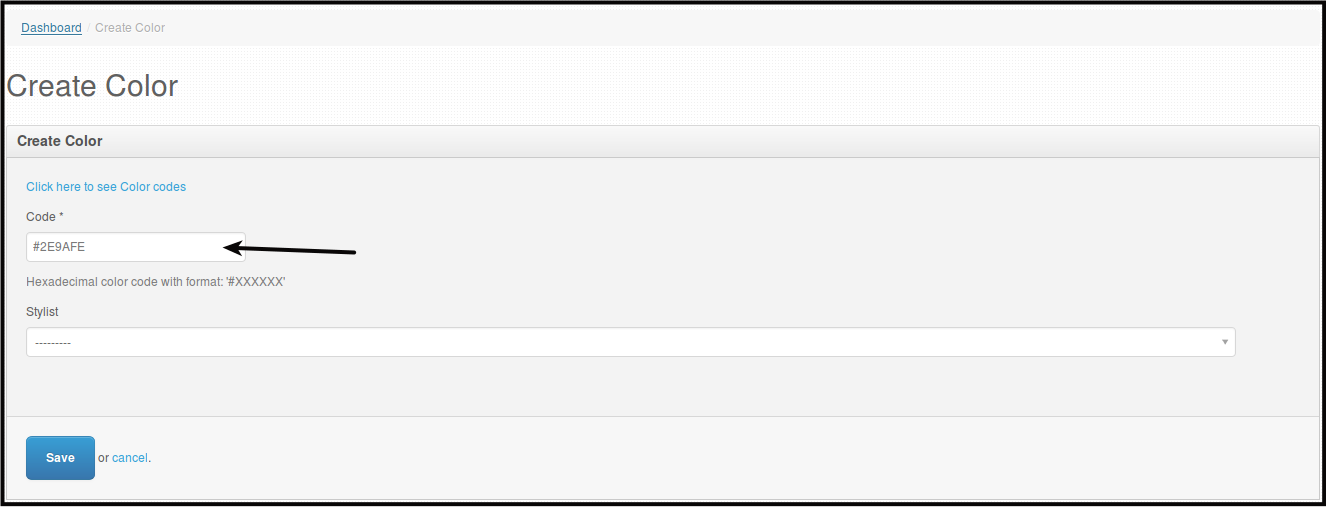
Click +Create new color.
-
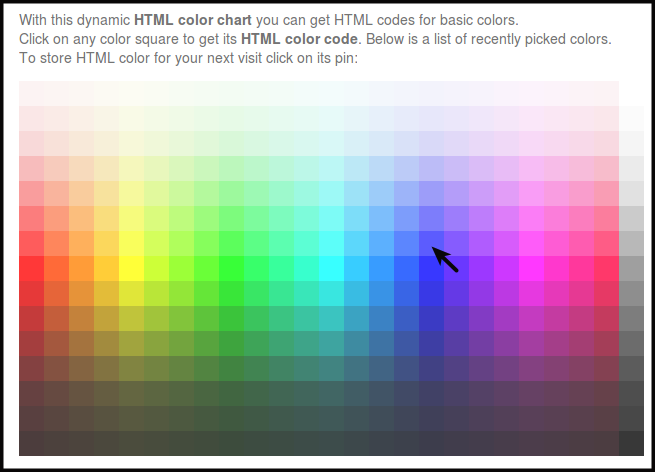
Click the hyperlink that says "Click here to see Color codes".
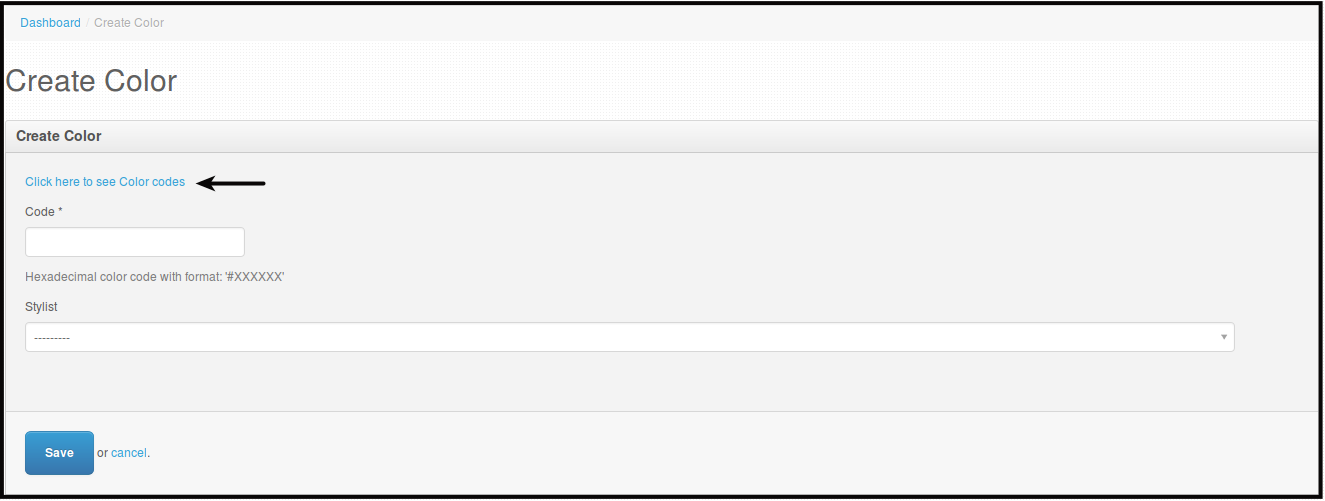
You will be directed to this page.
-
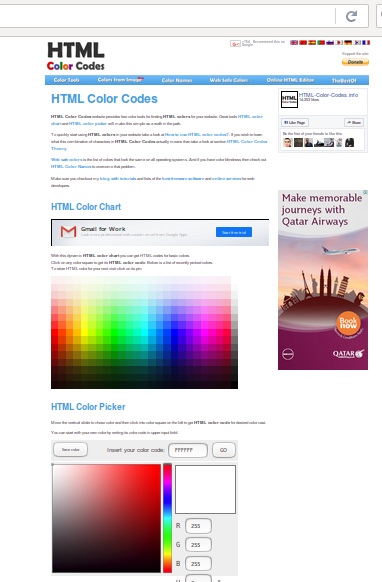
Browse the page until you can see the picture below.

-
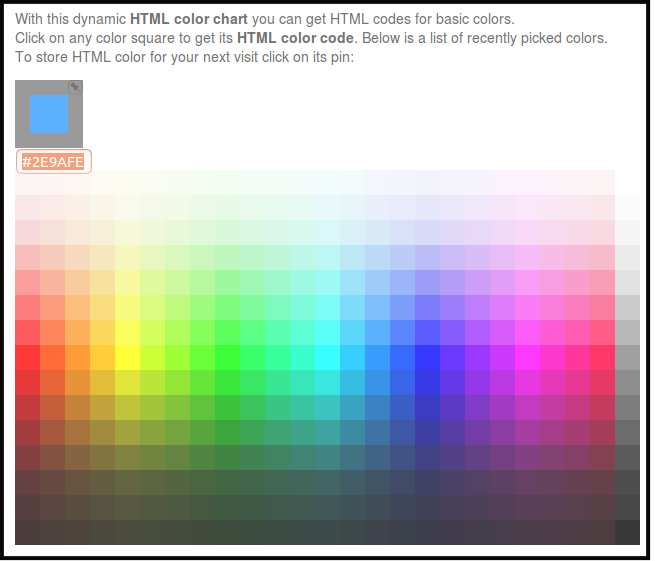
Pick the color you want, by clicking the Color.
You will see the code above right after you click the color you want.
-
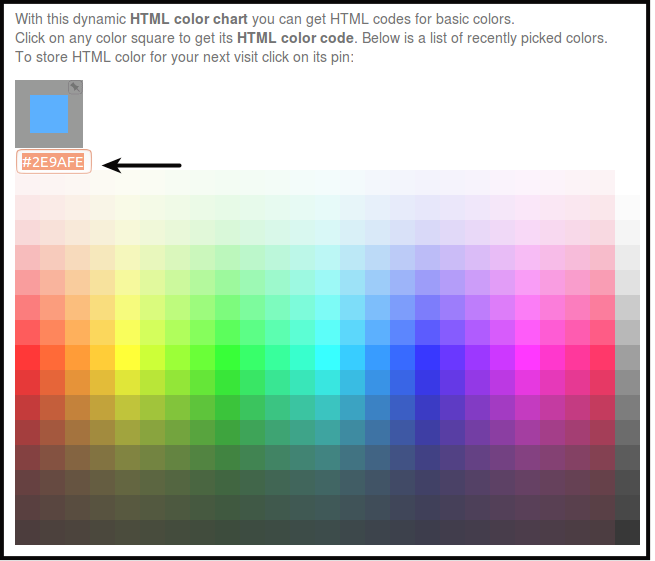
Copy the code you will see below the small box of the color you have choosen.
-
Go back to the browser where Pageboy Dashboard is at.
-
Paste the color code you have copied from the other webpage, to Code.
-
Choose the stylist you want to have the color from the stylist dropdown. Click Stylist.
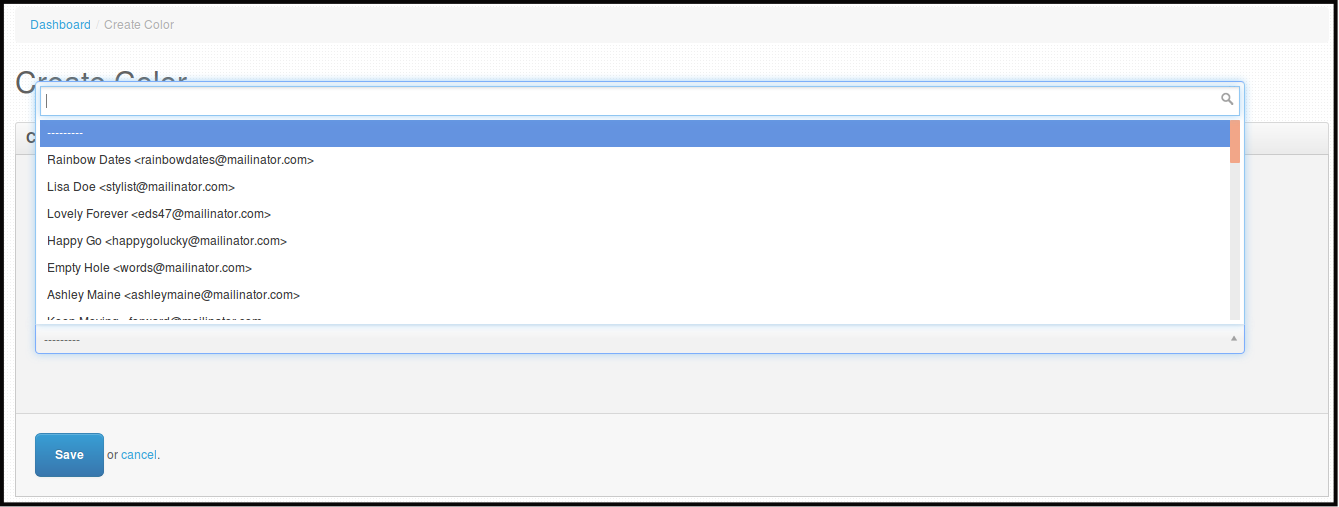
-
Click Save to save the changes.

You will be directed to this page.

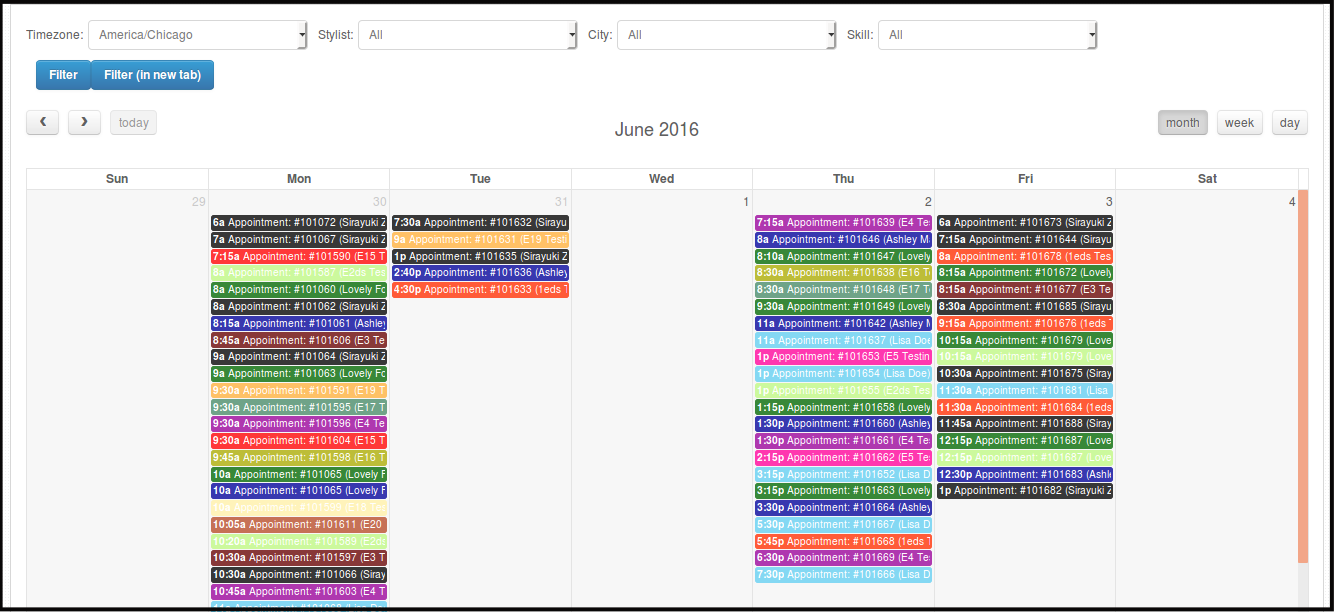
Note: You will see the stylist colors on Dashboard/Stylists Schedules, each colors represents a particular stylist.
How to Edit Stylist Color
-
Click Schedules.
-
Click Stylist Colors.
You will be directed to this page.
-
Click Edit beside the stylist you want to edit colors with.

You will be directed to this page.
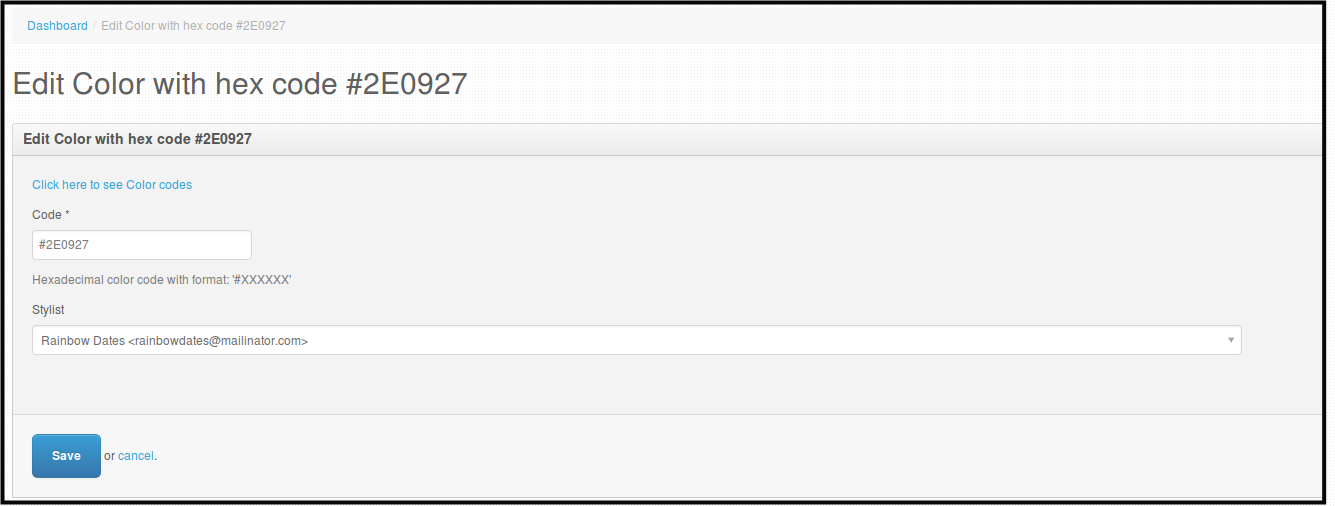
-
Here you can edit the Color Code or the stylist for the color code.
-
Click Save, to save the changes.

You will be directed to this page.

Note: You will see the stylist colors on Dashboard/Stylists Schedules, each colors represents a particular stylist.
Stylist Schedule Management
All Stylist Schedules can now be edited through Admin Access and will be directly implemented to Pageboy Mobile App.
-
Stylist Work Schedule.
-
Admin can now create stylist work schedule via web dashboard once they are set as reviewed.
-
Admin can now edit stylist work schedule via web dashboard once they are set as reviewed.
-
Admin can now delete stylist work schedule via web dashboard once they are set as reviewed.
-
-
Stylist Unavailable Schedule.
-
Admin can now create stylist unavailable schedule via web dashboard once they are set as reviewed.
-
Admin can now edit stylist unavailable schedule via web dashboard once they are set as reviewed.
-
Admin can now delete stylist unavailable schedule via web dashboard once they are set as reviewed.
-
How to Create Stylist Work Schedules
-
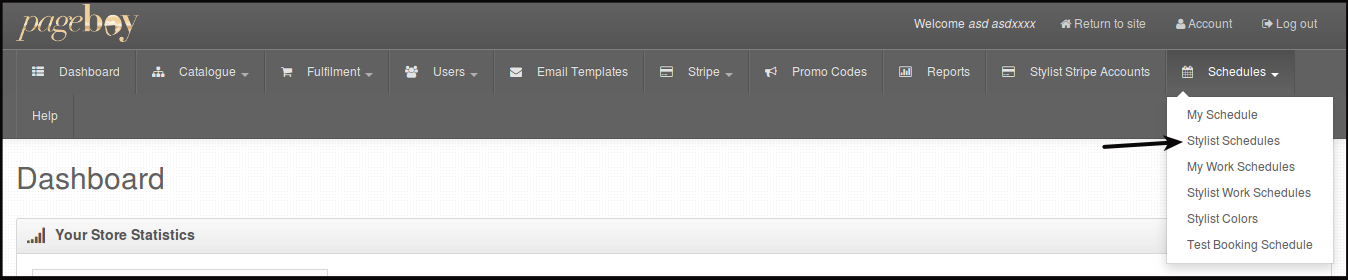
Click Schedules.
-
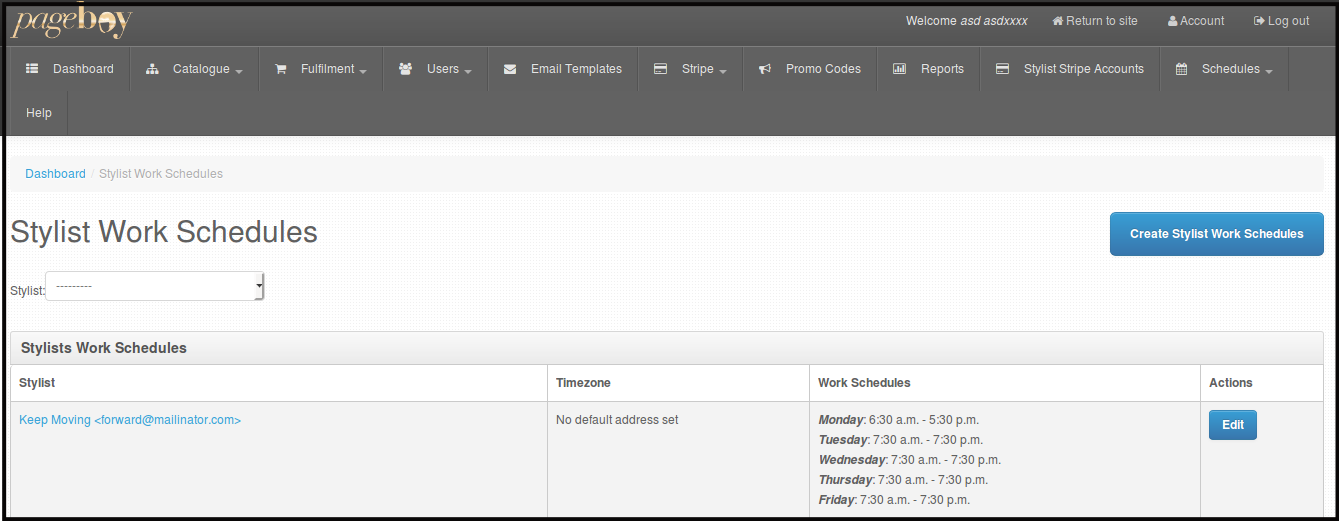
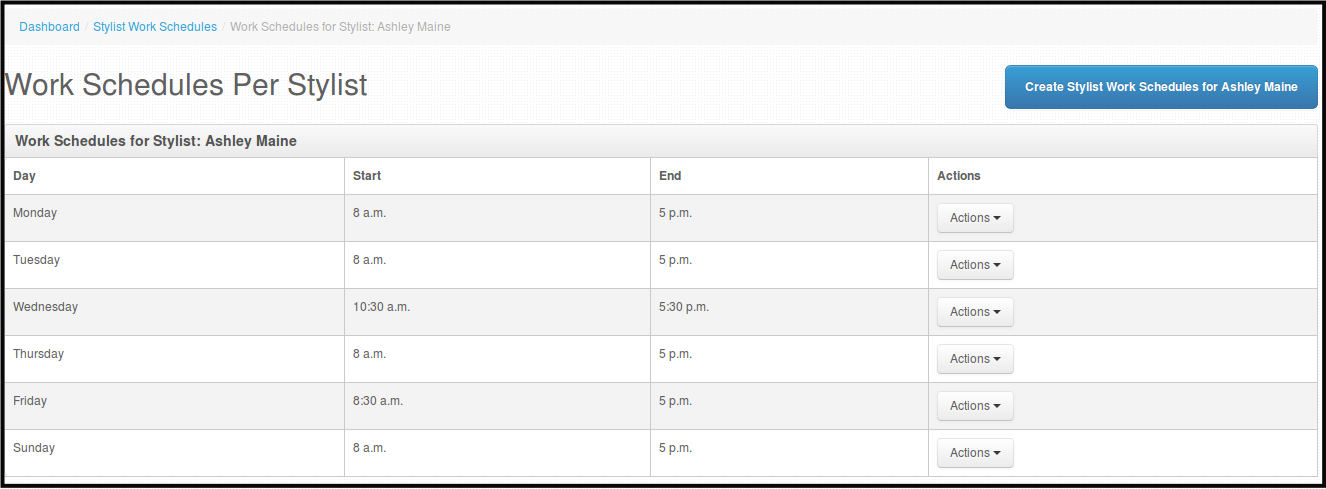
Click Stylist Work Schedules.

You will be directed to this page.
-
Click Create Stylist Work Schedules.

You will be directed to this page.
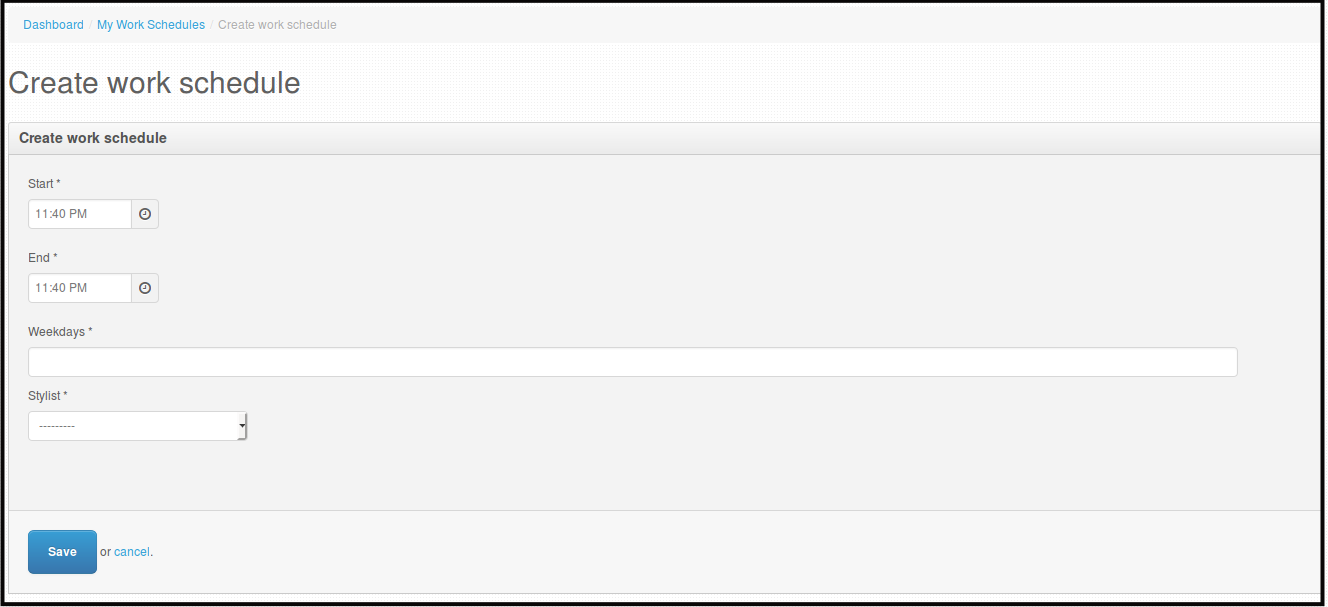
-
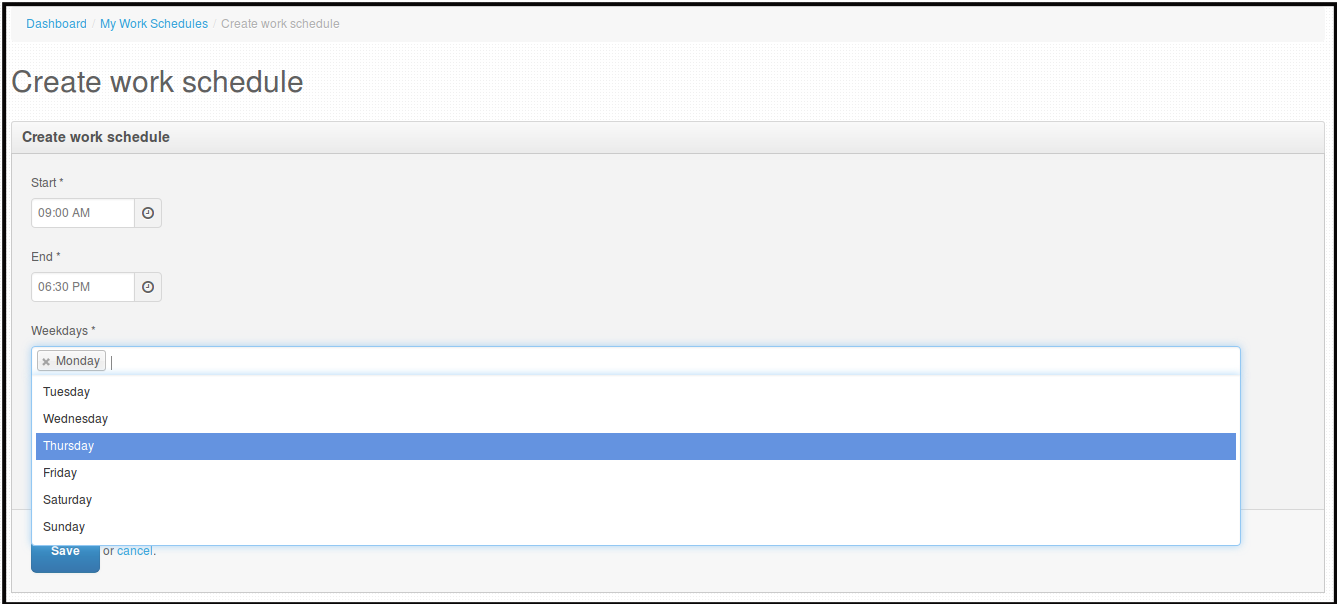
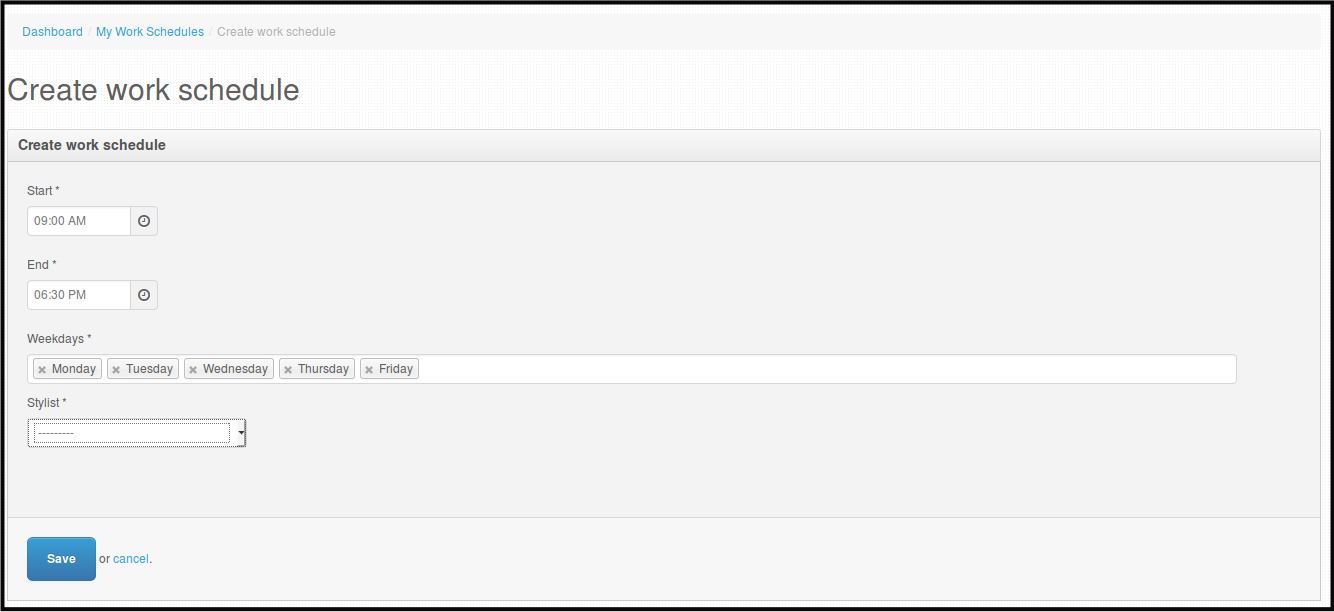
Fill out the Start, End, Weekdays and Stylist you want the schedule to belong to.
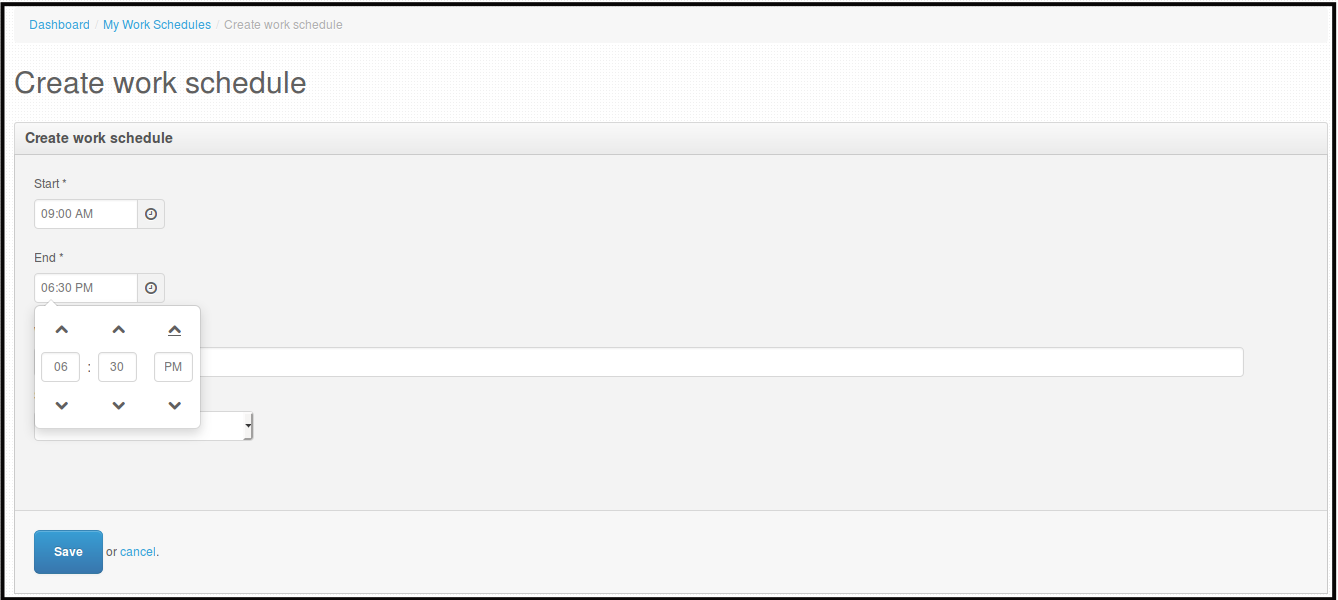
Weekdays is a dropdown where you can select multiple days.
Note: Only Reviewed stylist can be seen on Stylist dropdown.
-
Click Save, to save the changes.

You will be directed to this page.

How to Edit Stylist Work Schedules
-
Click Schedules.
-
Click Stylist Work Schedules.
You will be directed to this page.
-
Click Edit beside the name of the stylist you want to edit schedule.

You will be directed to this page.
-
Click Action beside the day of the work schedule you want to edit.
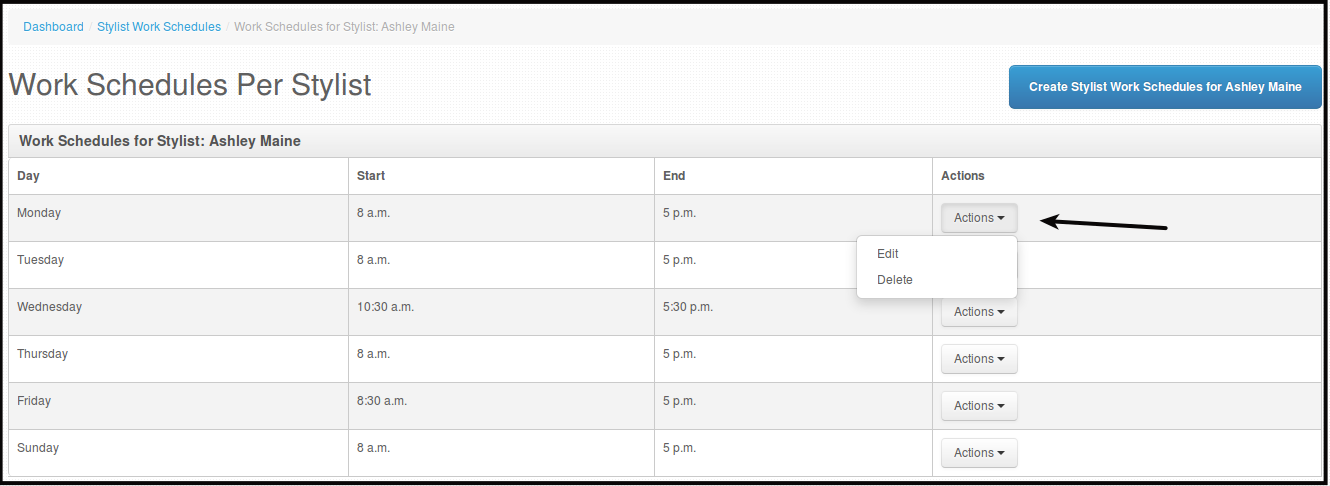
-
Click Edit.
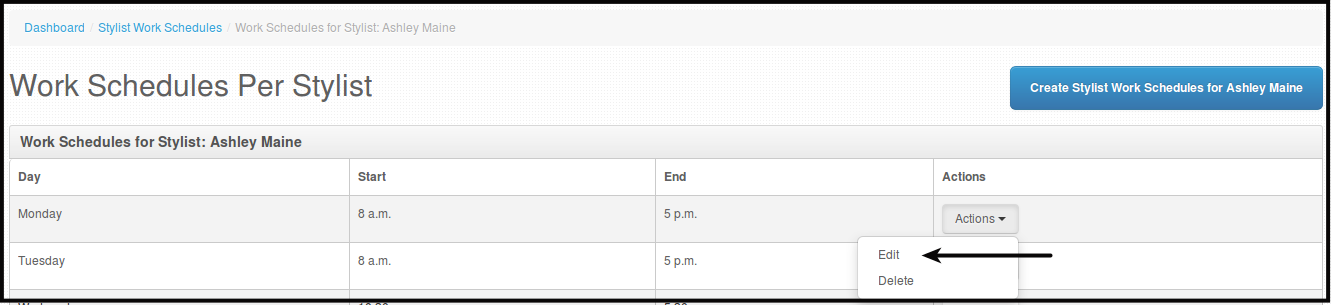
You will be directed to this page.
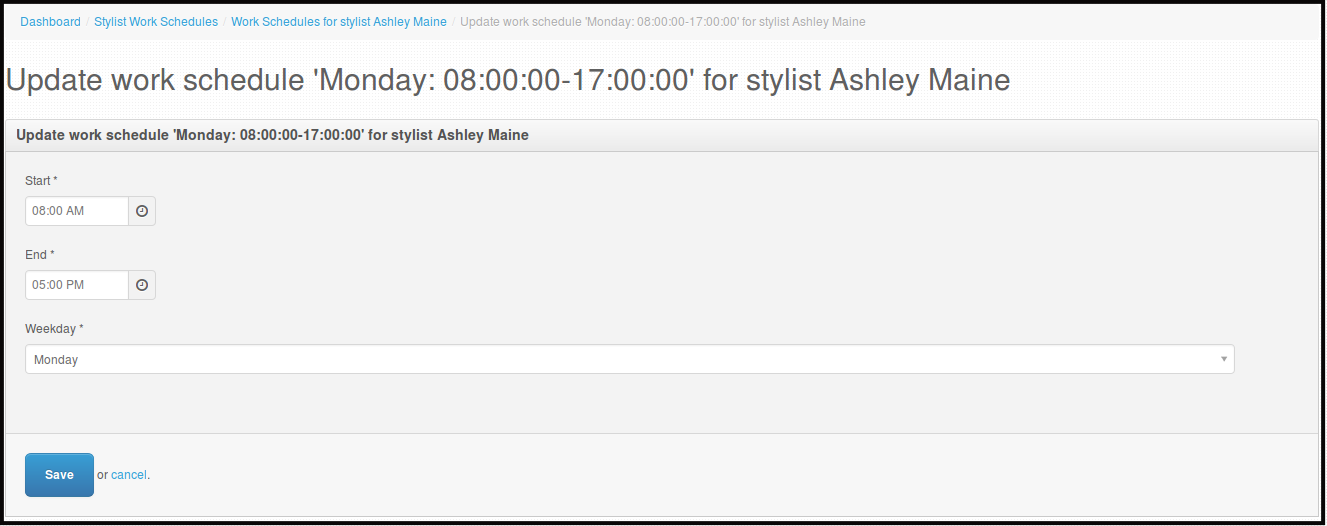
-
Edit the Start and/or End time and or the day you want to edit, this will supersede the initial schedule set for that day or days.
-
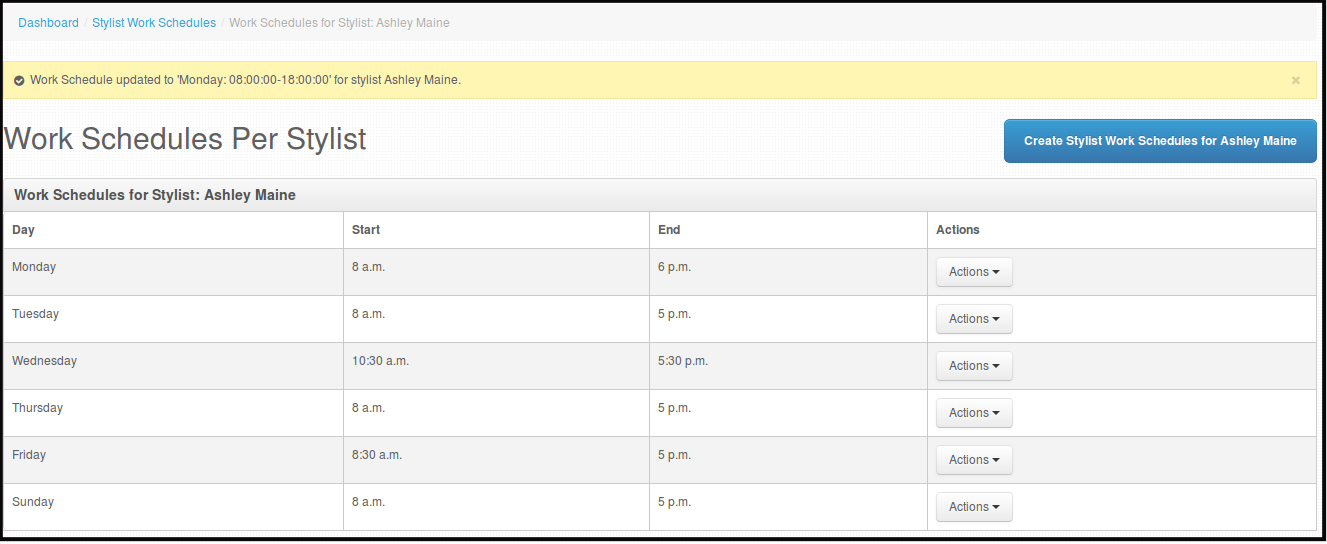
Click Save, this will save the changes you made on the schedule.
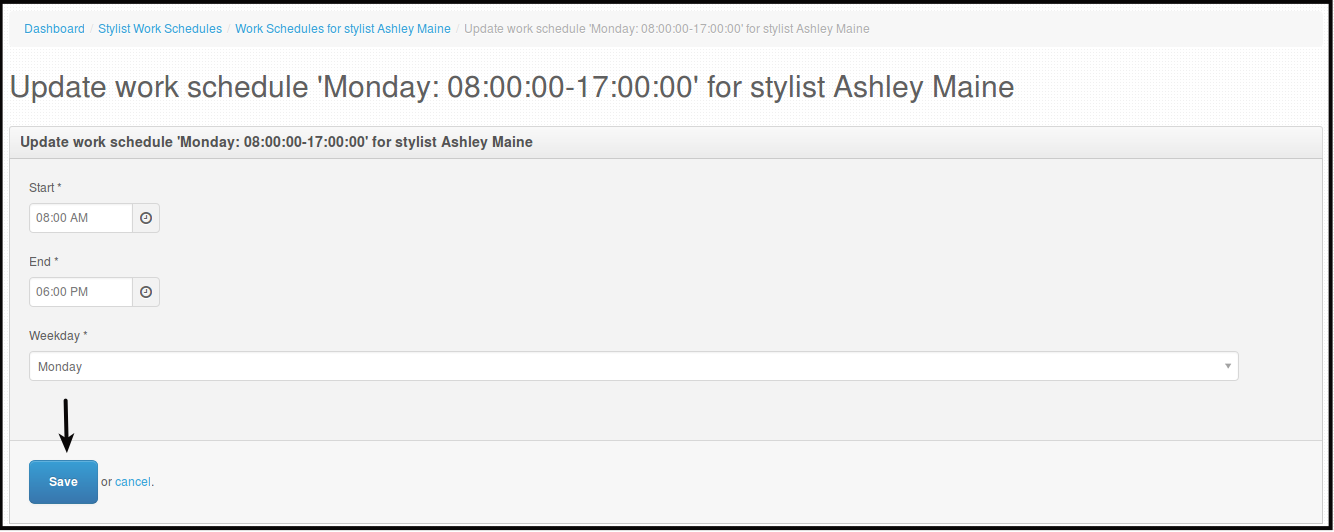
You will be directed to this page.
How to Delete Stylist Work Schedules
-
Click Schedules.
-
Click Stylist Work Schedules.
You will be directed to this page.
-
Click Edit beside the name of the stylist you want to edit schedule.
You will be directed to this page.
-
Click Action beside the day of the work schedule you want to delete.
-
Click Delete.
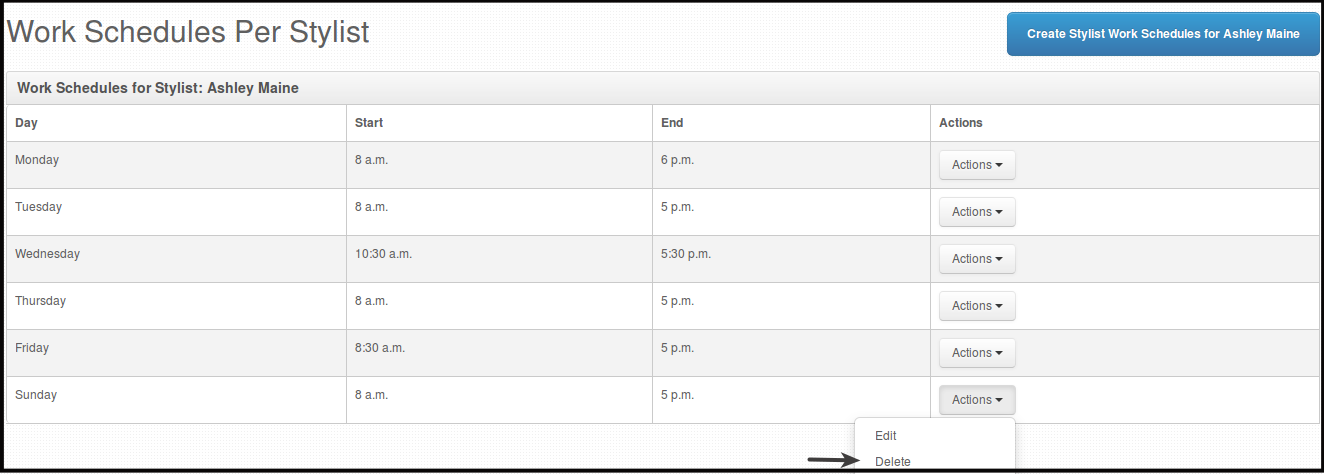
You will be directed to this page.
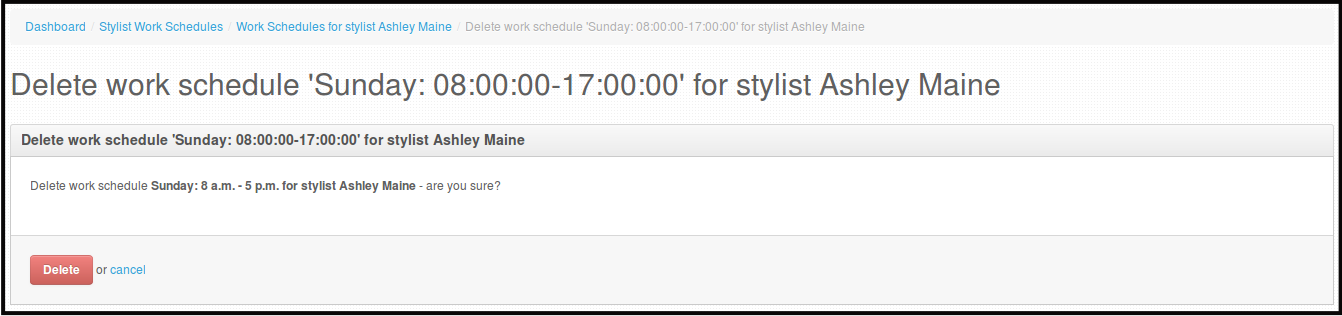
-
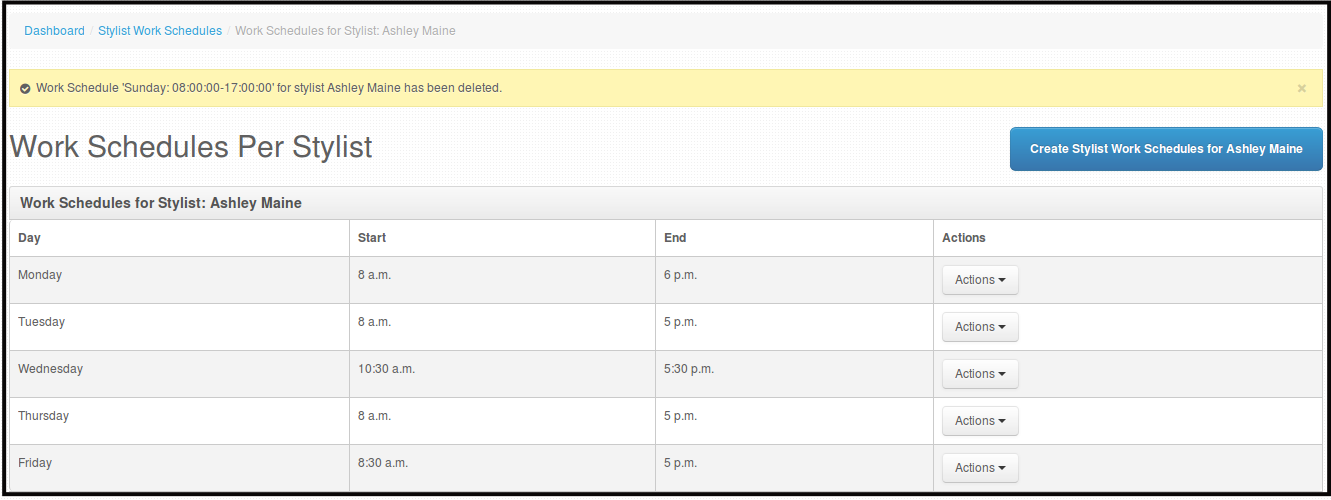
Click Delete, this will confirm that you are deleting the schedule.
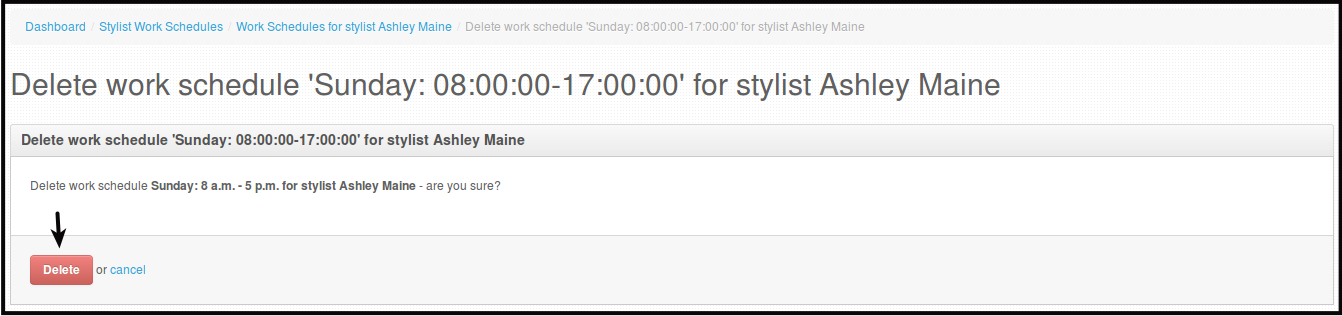
You will be directed to this page.
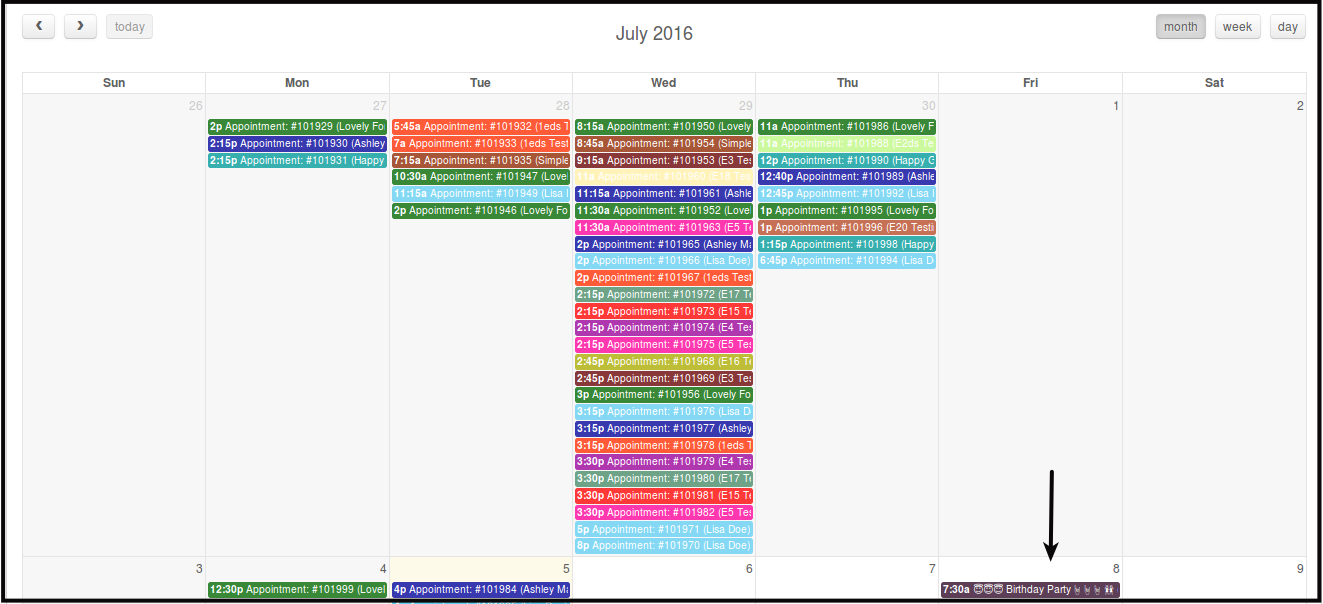
How to Create Unavailable Schedule for Stylist
-
Click Schedules.
-
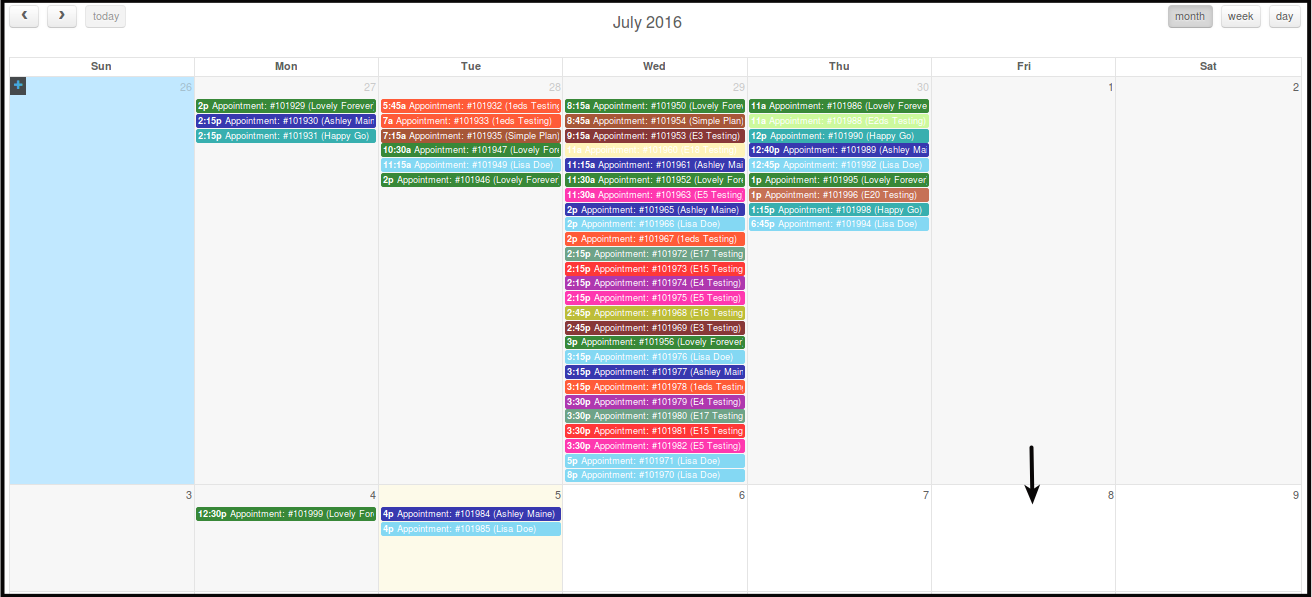
Click Stylist Schedules.
You will be directed to this page.
-
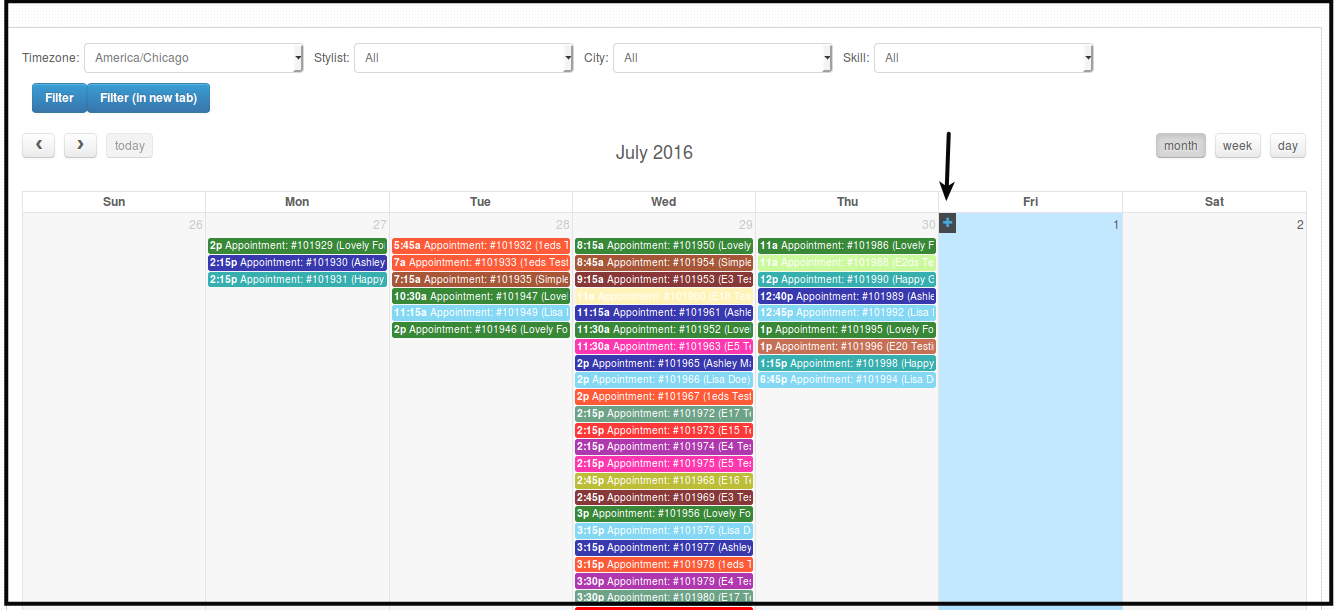
Hover your mouse to the date you want to set unavailable schedule for stylist. You will see a + sign.
-
Click + sign.
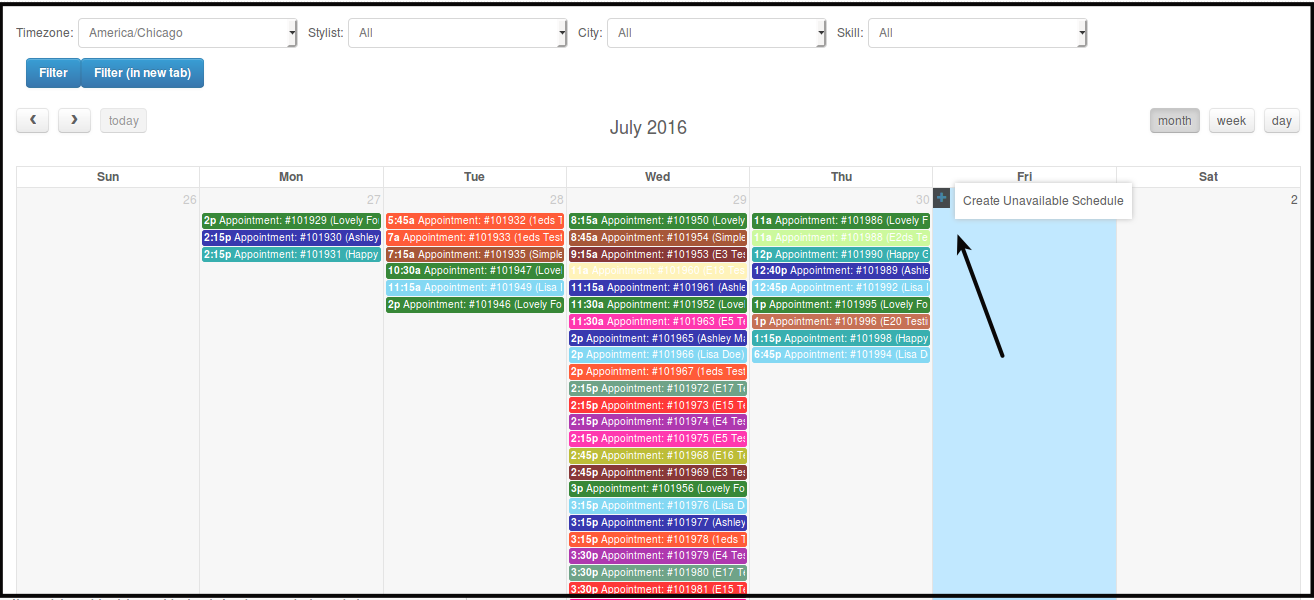
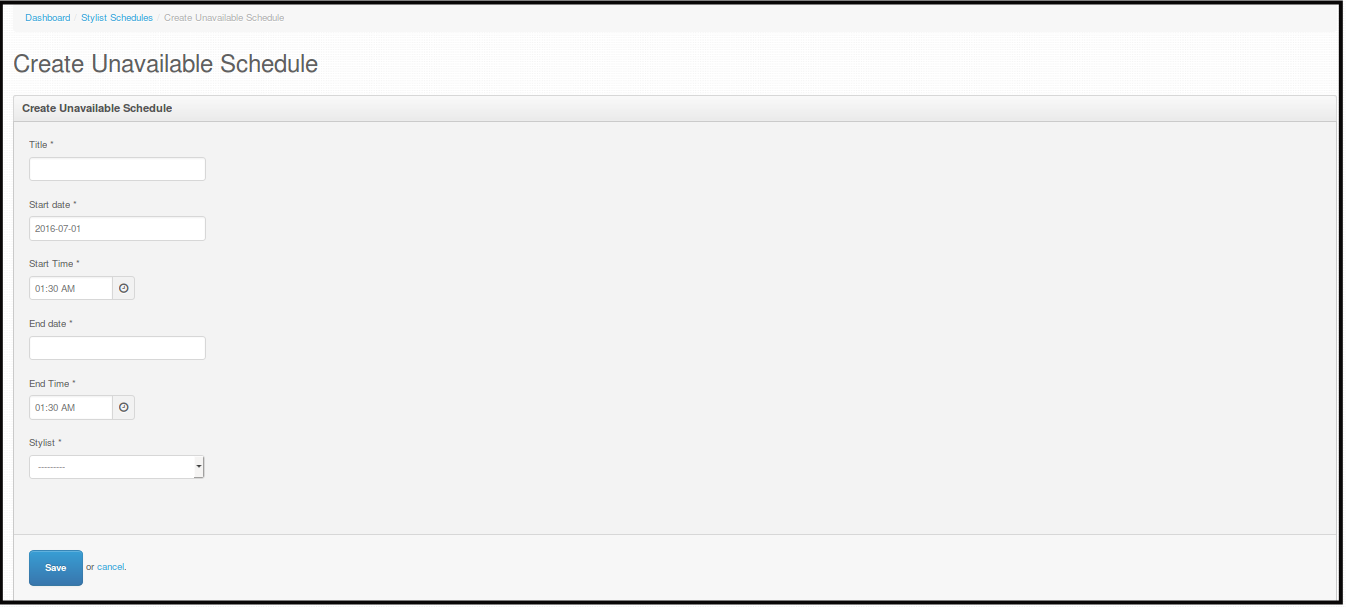
You will be directed to this page.
-
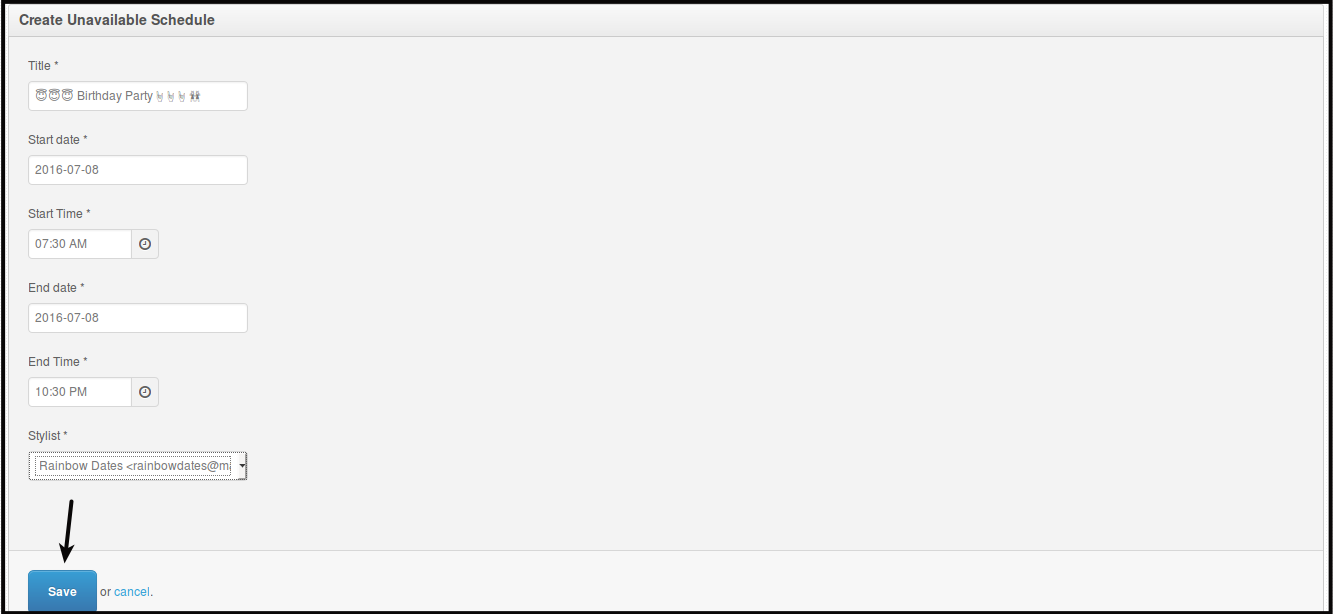
Fill out the Title of the unavailable schedule, you can use emoticons/emoji if you want too, Start date, End date and choose from the drop down the stylist you want the unavailable schedule for.

-
Click Save, to save the unavailable schedule, this update will directly reflect on the stylist Pageboy mobile app as well.
You will be directed to this page.
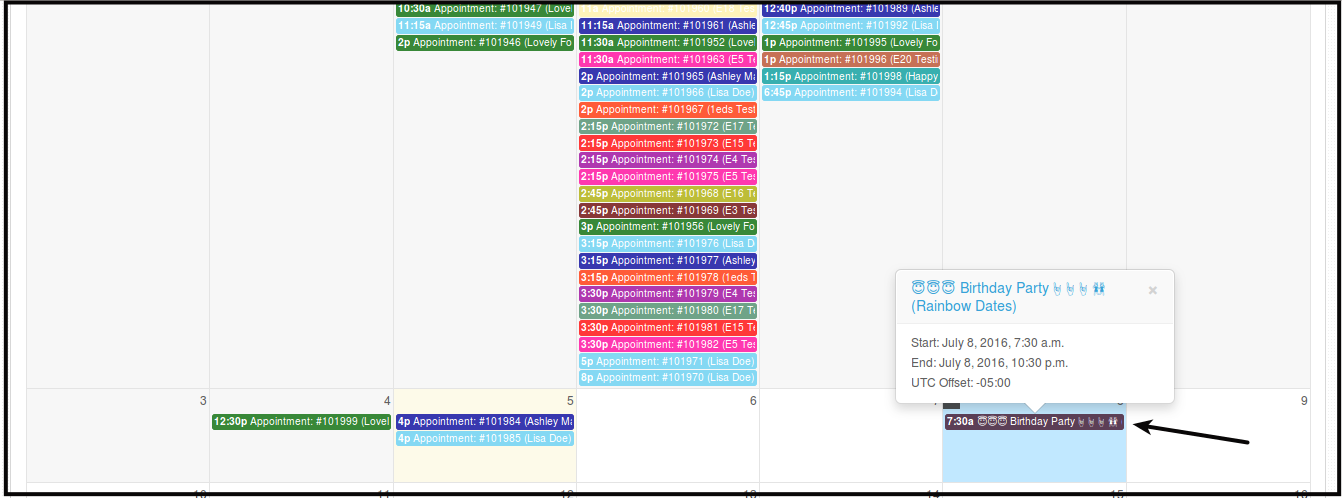
How to Edit Unavailable Schedule for Stylist
-
Click Schedules.
-
Click Stylist Schedules.
You will be directed to this page.
-
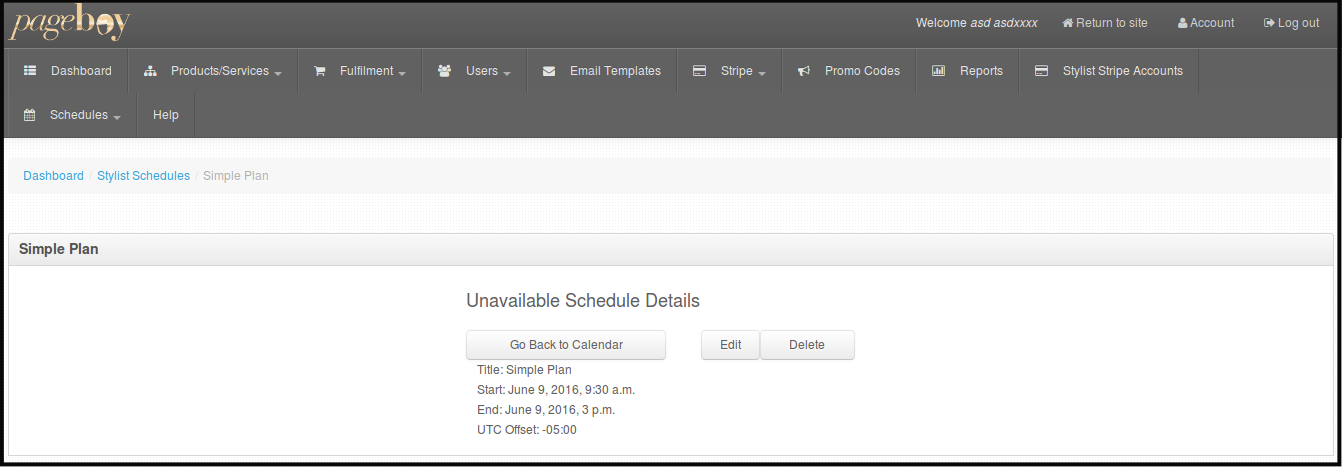
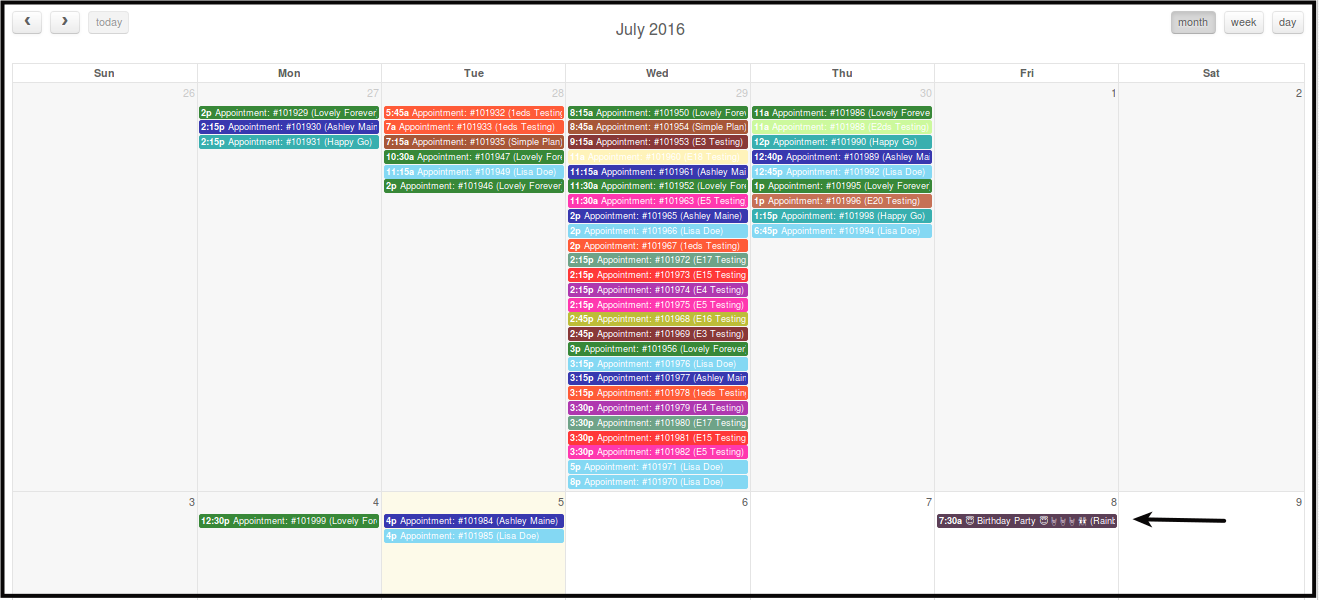
Click Unavailable Schedule you want to edit from the calendar.
-
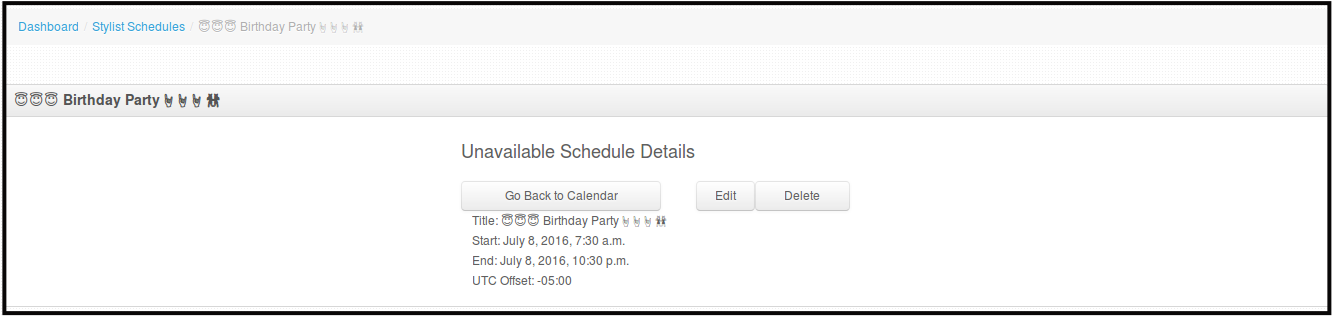
Click Blue description of the unavailable schedule.
You will be directed to this page.
-
Click Edit.

You will be directed to this page.
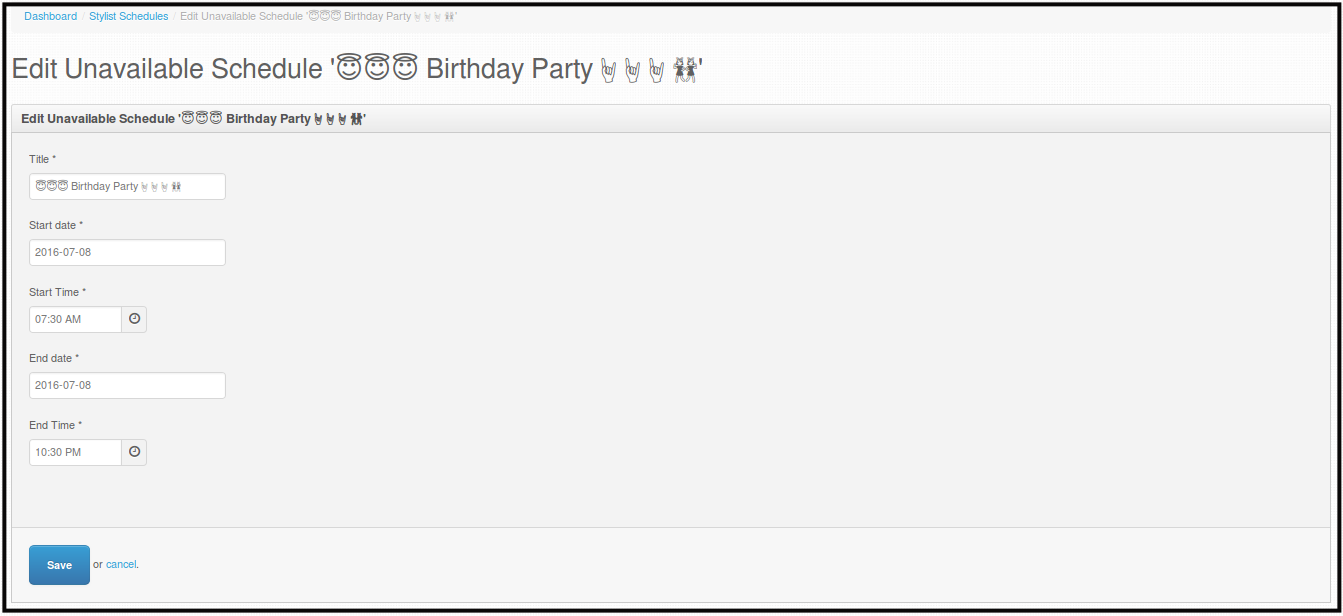
-
Edit the detail you want to edit, like Title, Start date, Start time, End date and End time.
-
Click Save, to save changes.
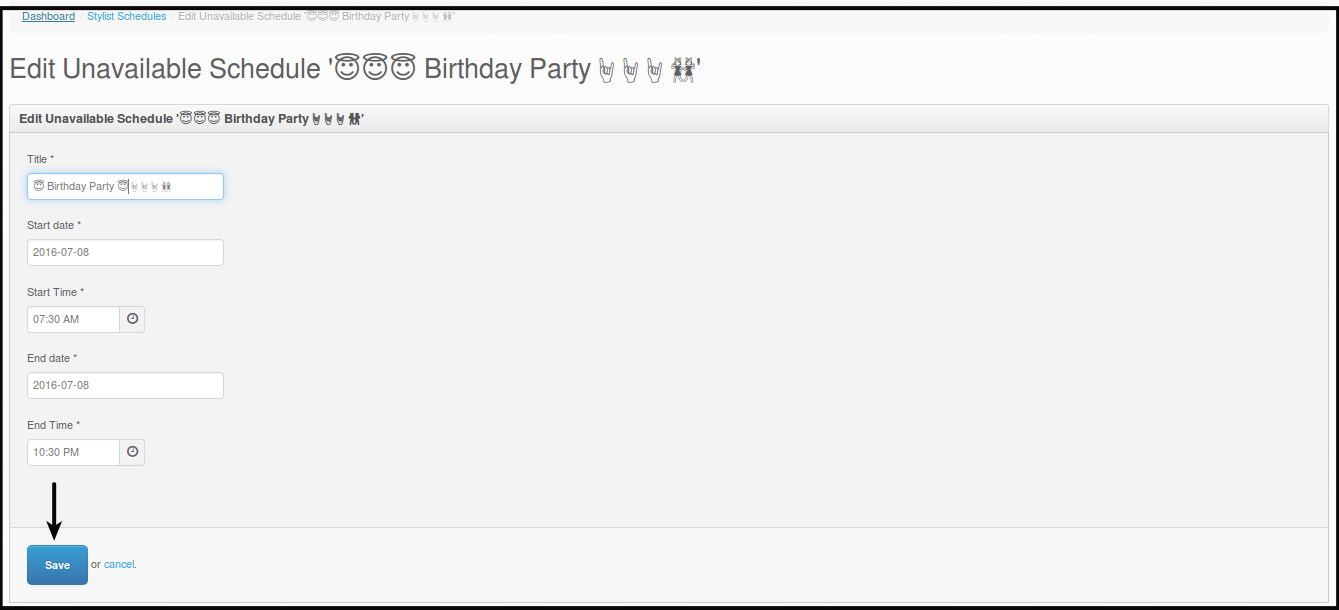
You will be directed to this page.
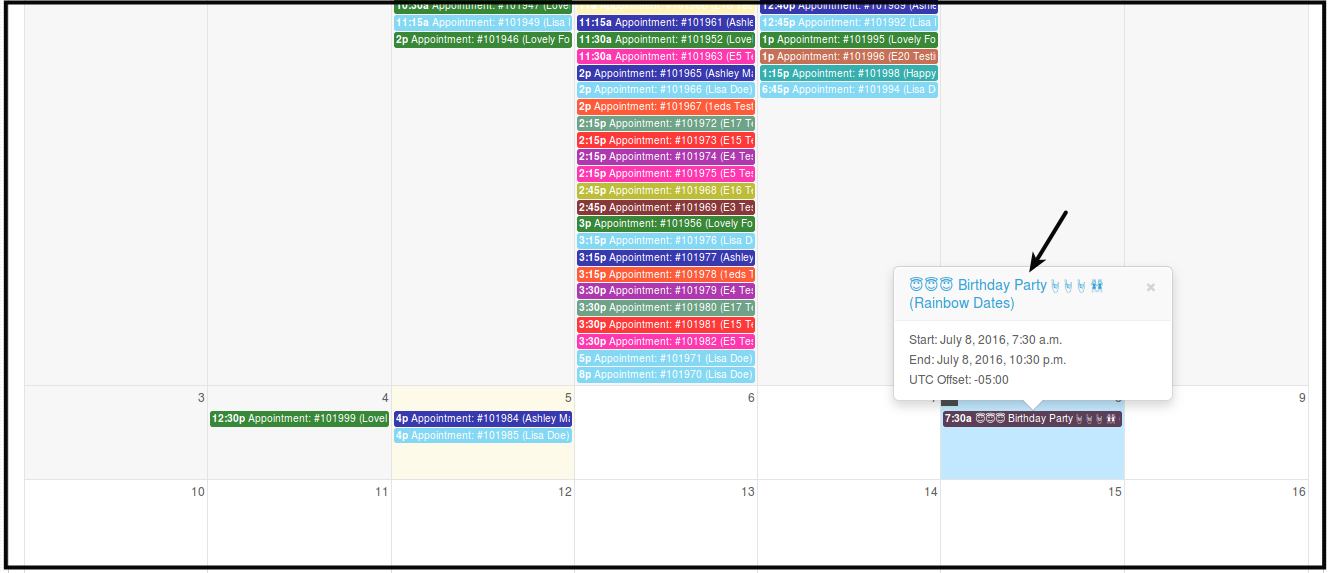
How to Delete Unavailable Schedule for Stylist
-
Click Schedules.
-
Click Stylist Schedules.
You will be directed to this page.
-
Click Unavailable Schedule you want to delete from the calendar.
-
Click Blue description of the unavailable schedule.
You will be directed to this page.
-
Click Delete.
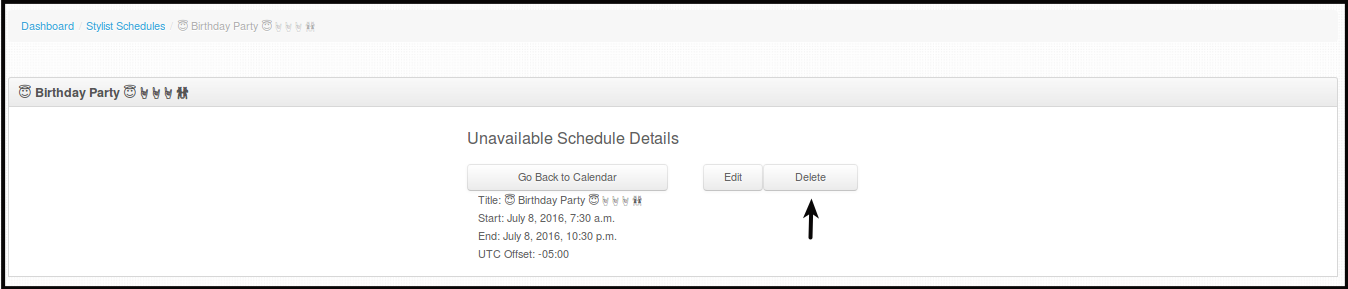
You will see a pop up message.
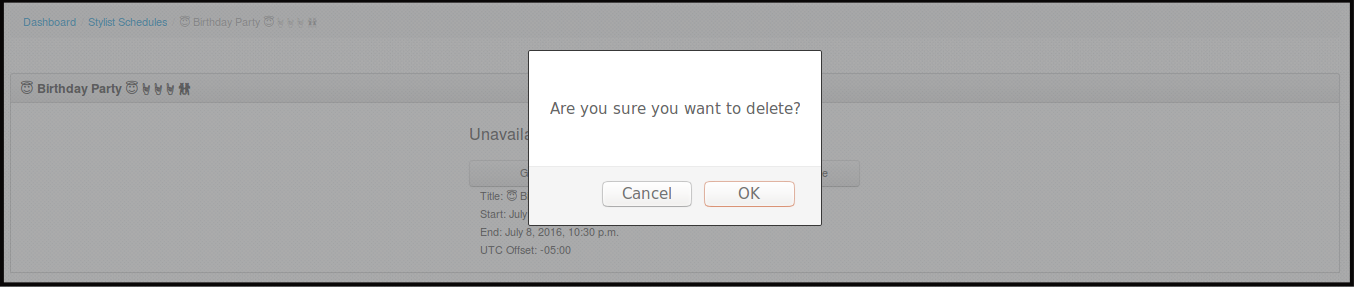
-
Click OK, this will delete the unavailable schedule permanently.
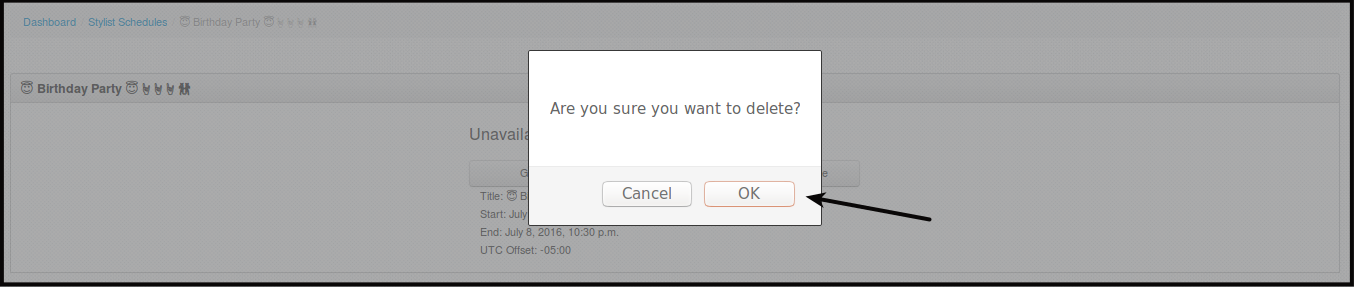
You will see a pop up message.
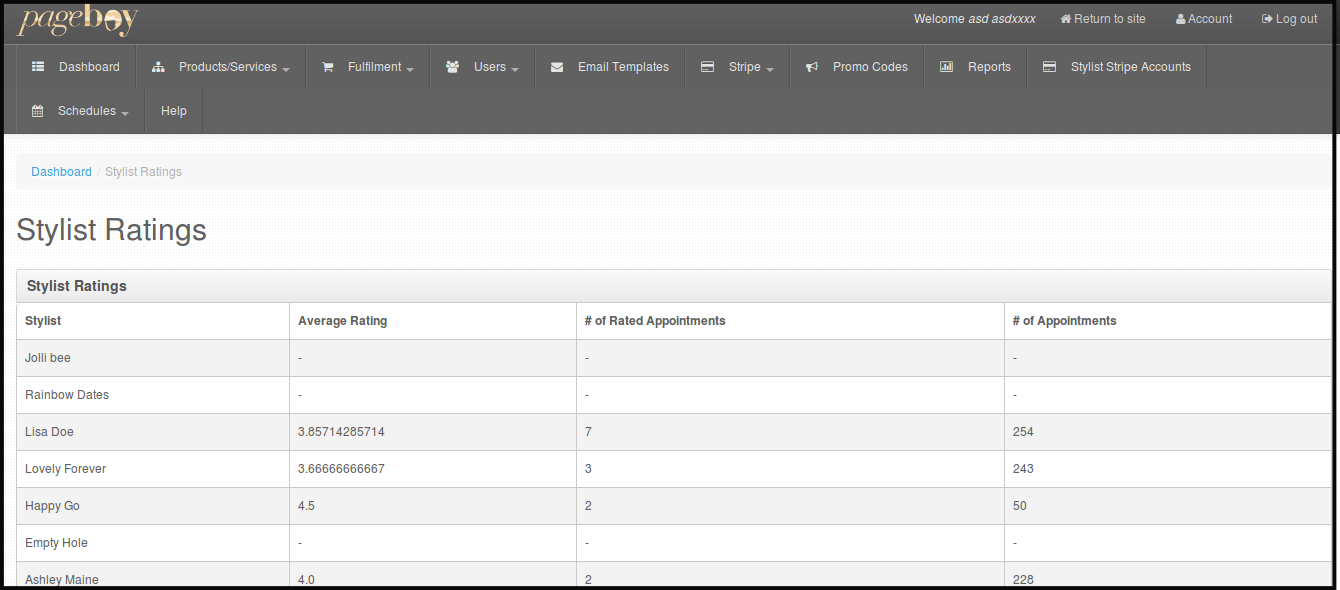
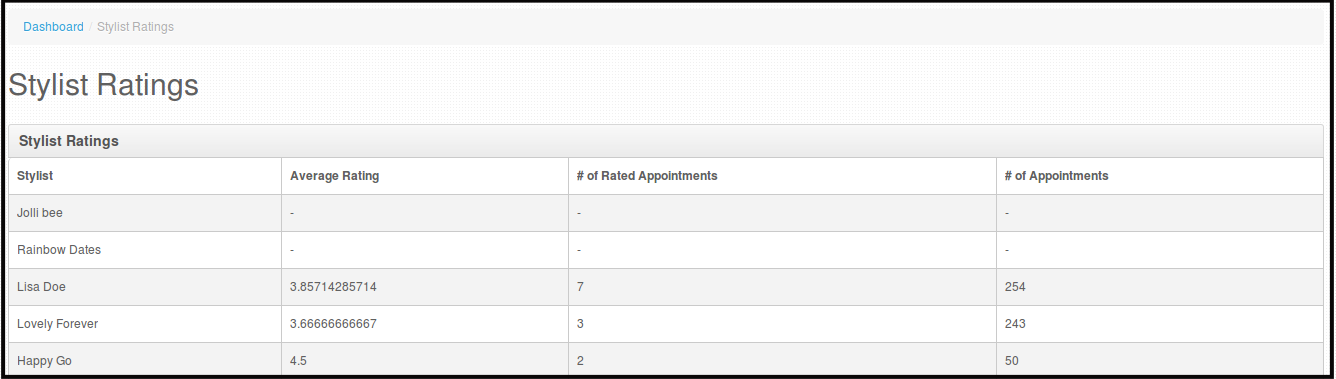
How to View Stylist Ratings
-
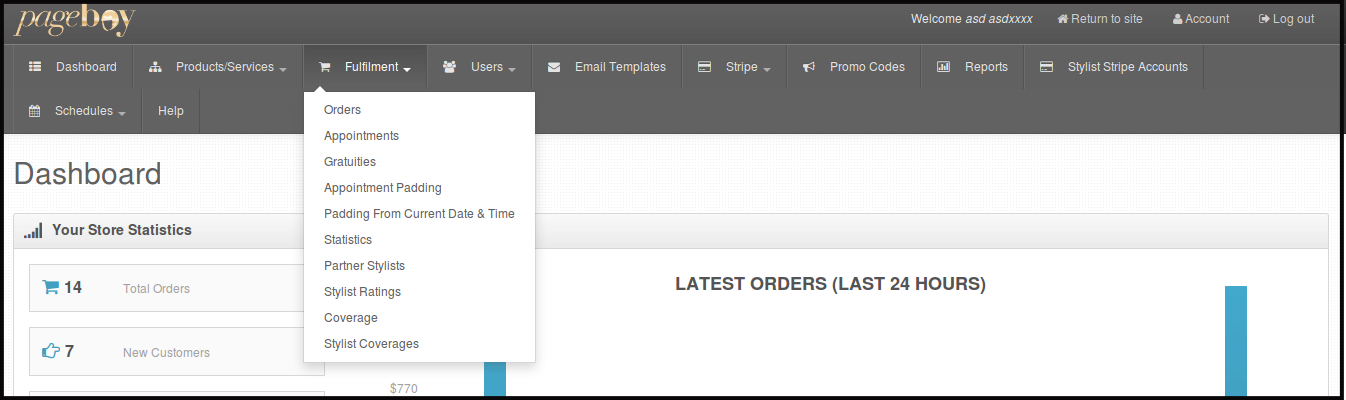
Click Fulfillment.
-
Click Stylist Ratings.

You will be directed to this page. Where you can see the name of the stylist, average rating per stylist, number of answered surveys per stylist and number of appointments they have handled.
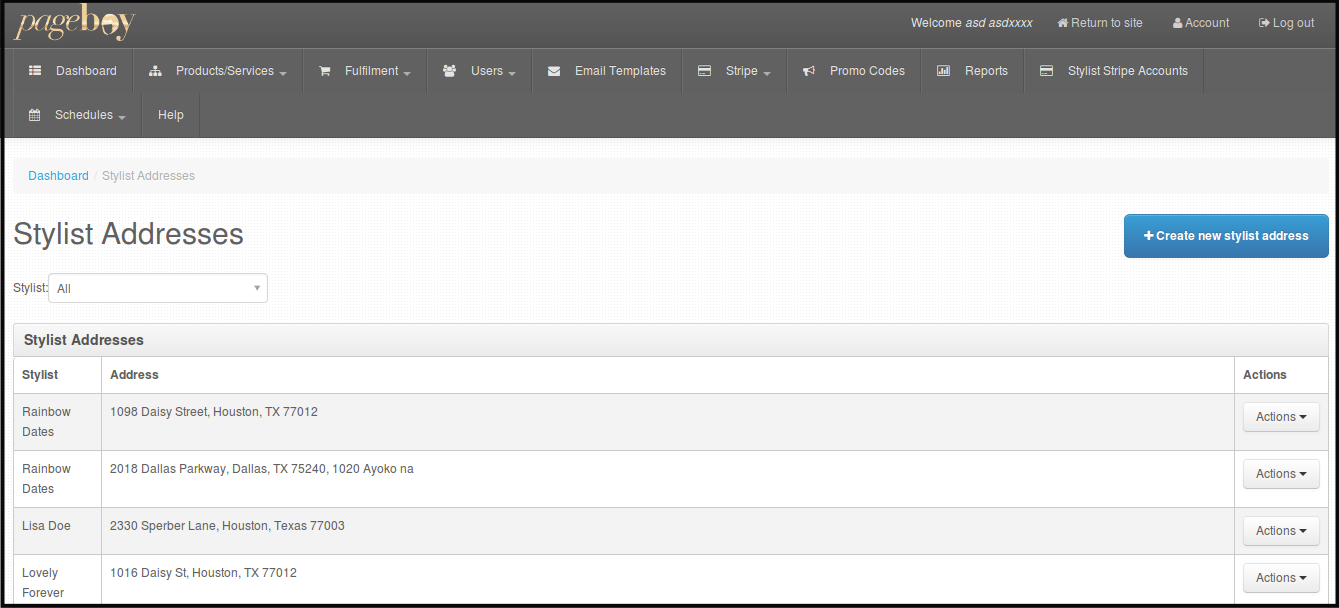
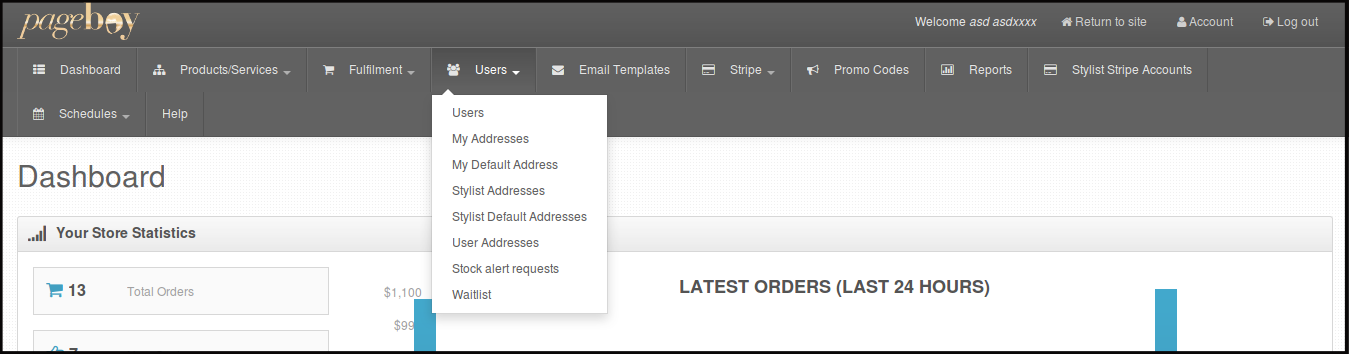
How to Add/Create Stylist Address via Admin Web Dashboard
-
Click Users.
-
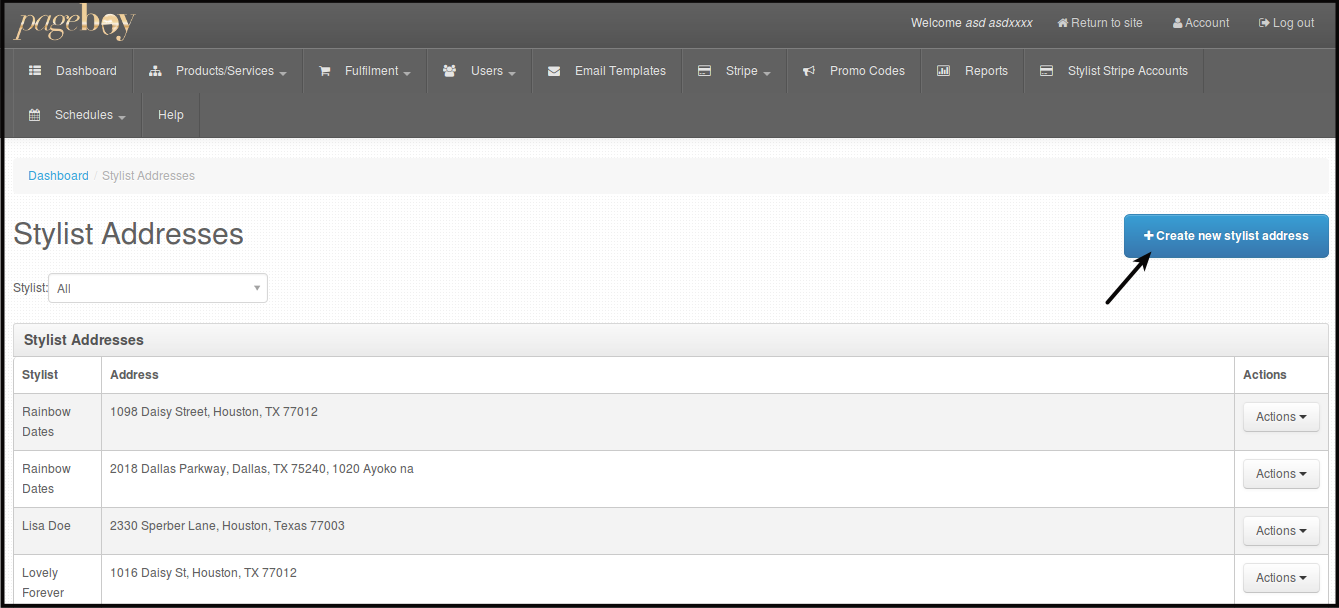
Click Stylist Addresses.

You will be directed to this page.
-
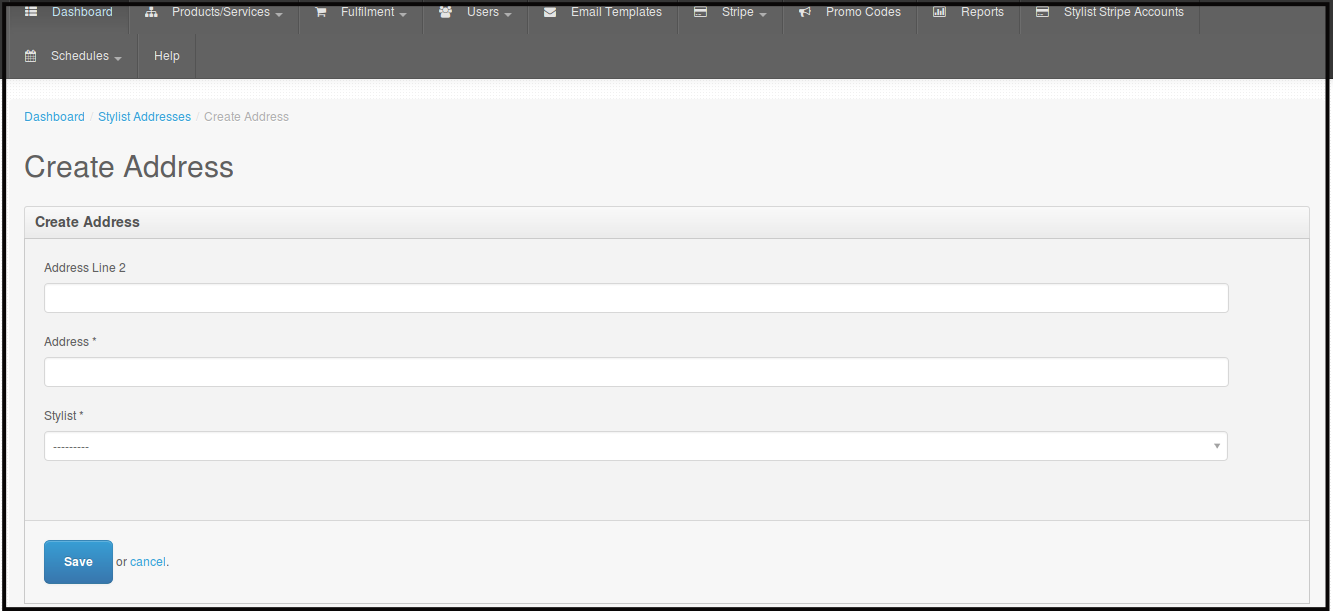
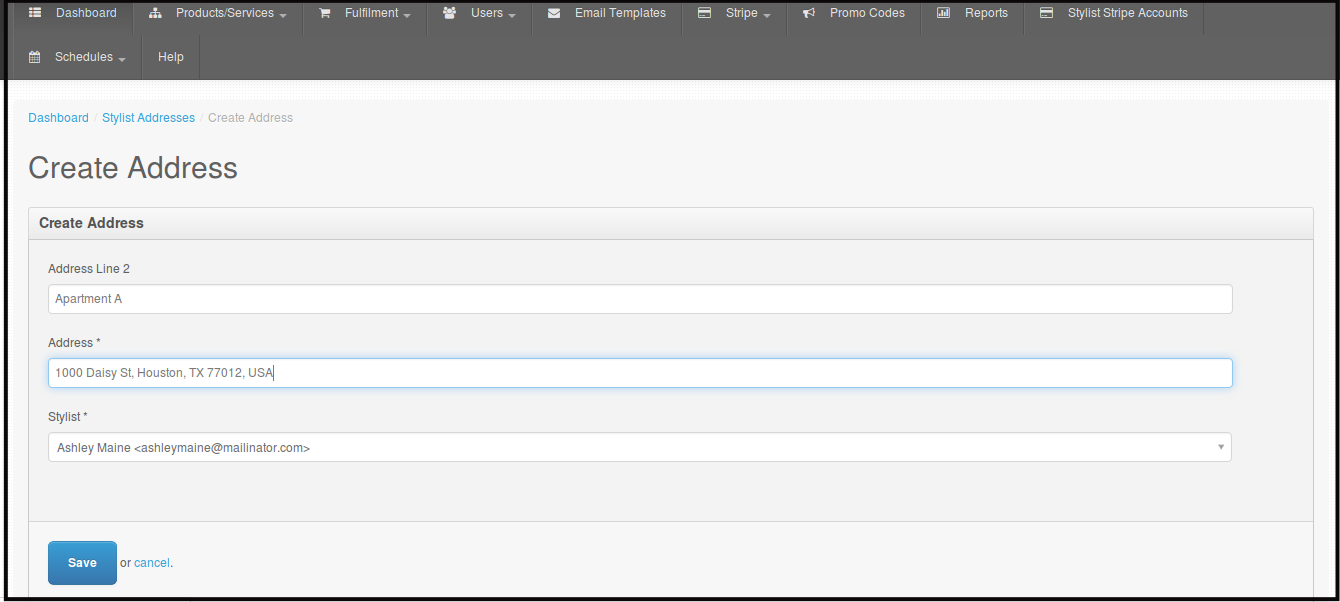
Click +Create new stylist address.
You will be directed to this page.
-
Fill out the form by putting in the stylist address, Address line 2 is for Apartment/Suite Number or something like that, Address, and from the dropdown the stylist.
-
Click Save.
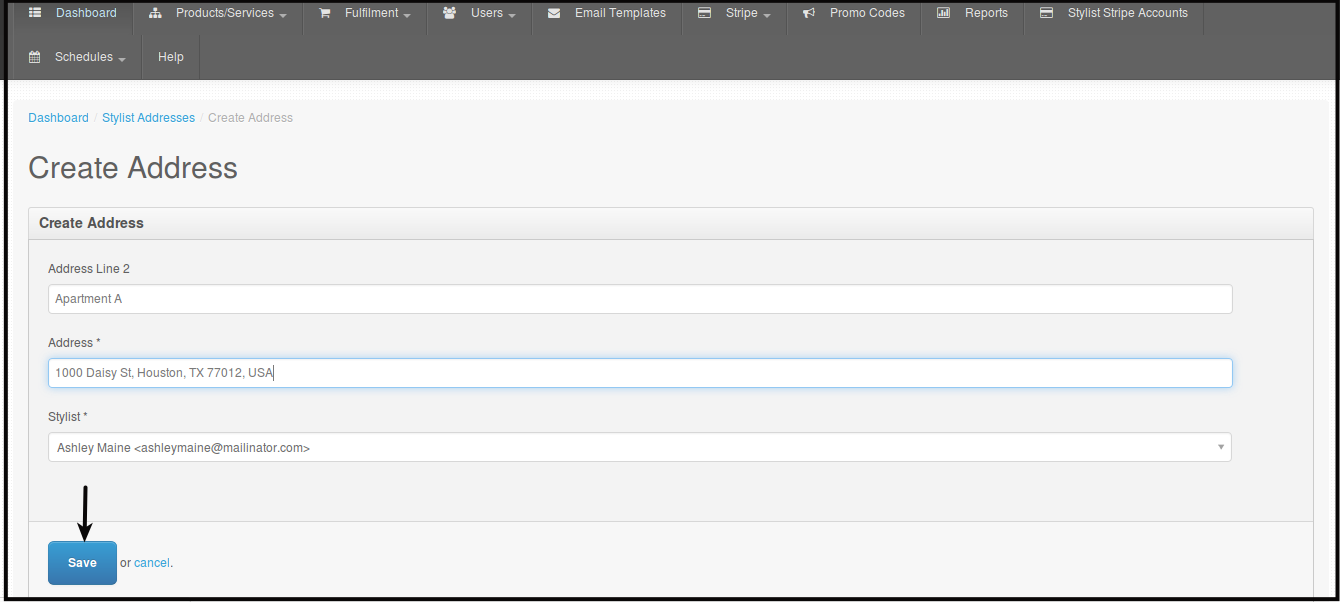
You will be directed to this page.
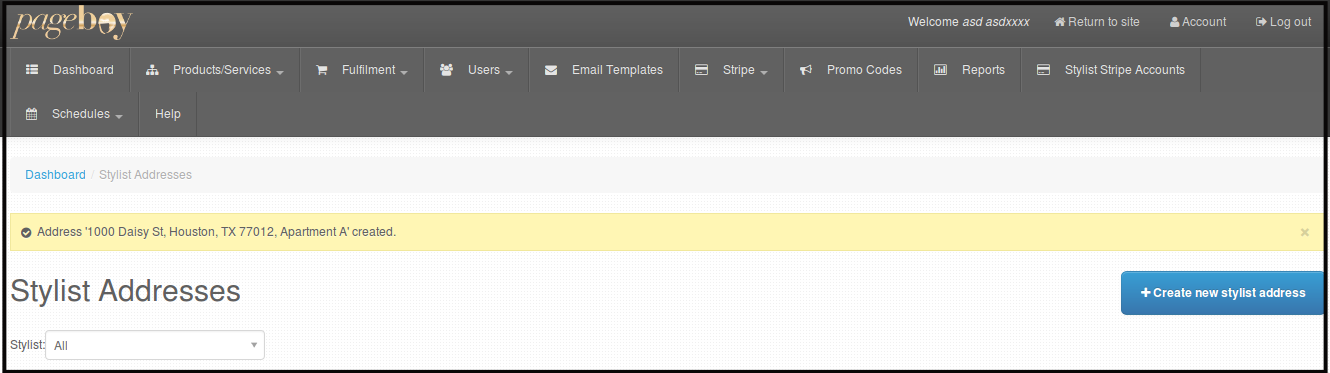
NOTE: Automatically the newly saved Stylist address will be the stylist default address, that address will be the reference for stylist radius coverage and this change will automatically update the stylist address on Pageboy Mobile App.
How to Edit Stylist Address via Admin Web Dashboard
-
Click Users.
-
Click Stylist Addresses.
You will be directed to this page.
-
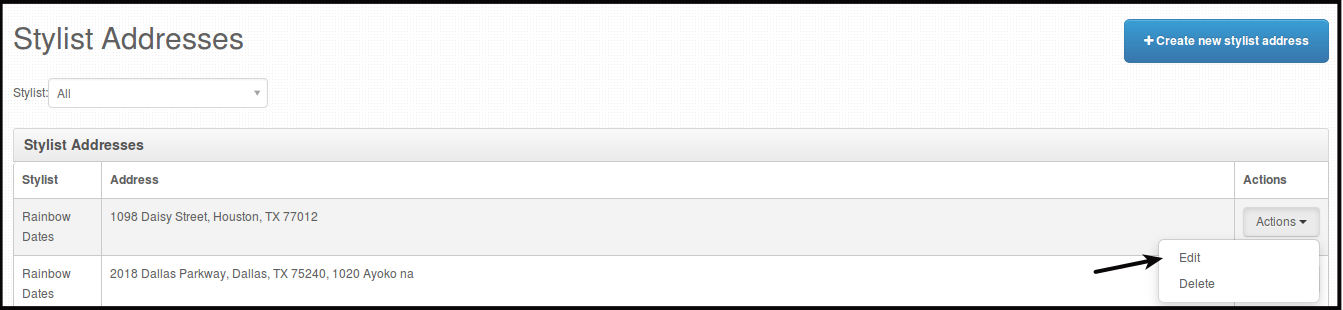
Click Actions beside the name and address of the stylist you want to edit the address.

-
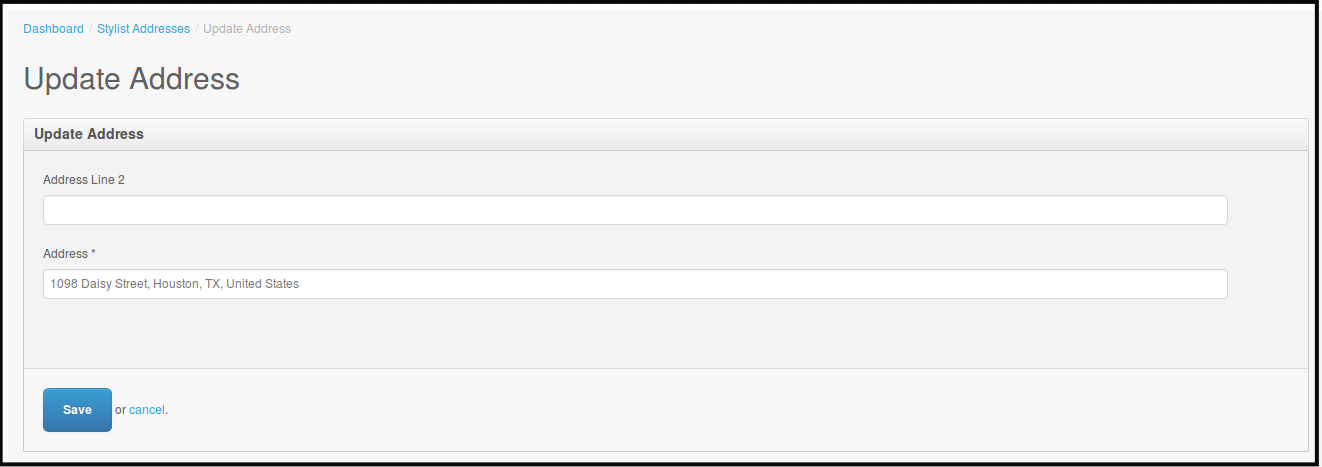
Click Edit.
You will be directed to this page.
-
Edit the address.
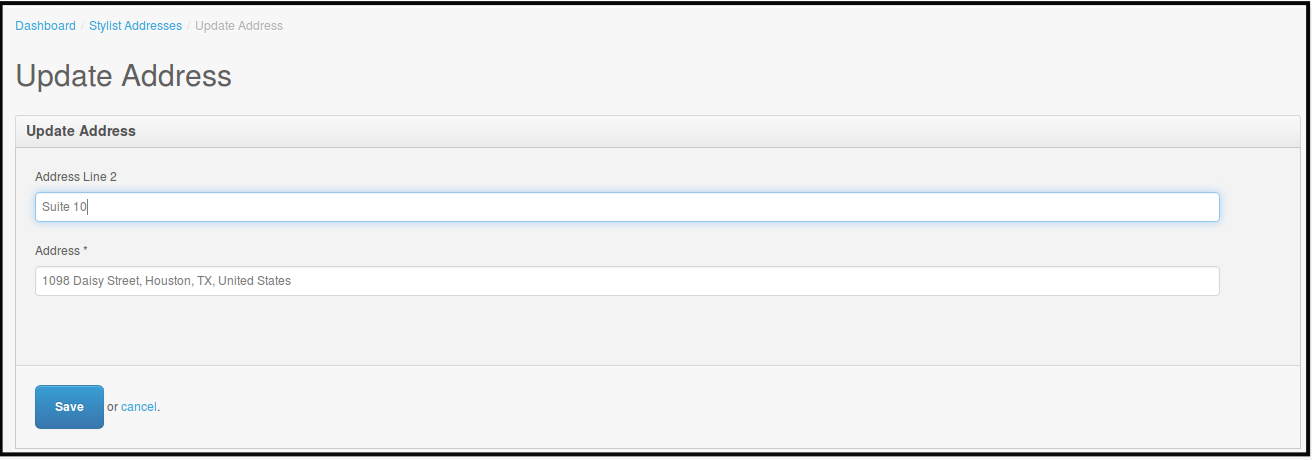
-
Click Save.
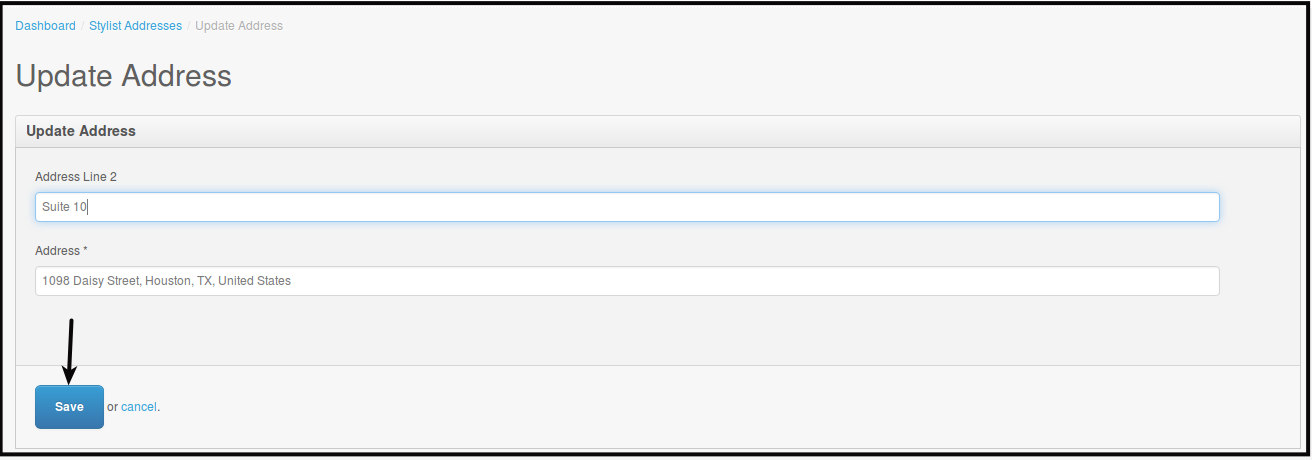
You will be directed to this page.

NOTE: Editing stylist address will not change the one that is on the stylist default address or on Pageboy Stylist Settings.
How to Delete Stylist Address via Admin Web Dashboard
-
Click Users.
-
Click Stylist Addresses.
You will be directed to this page.
-
Click Actions beside the name and address of the stylist you want to delete the address.
-
Click Delete.
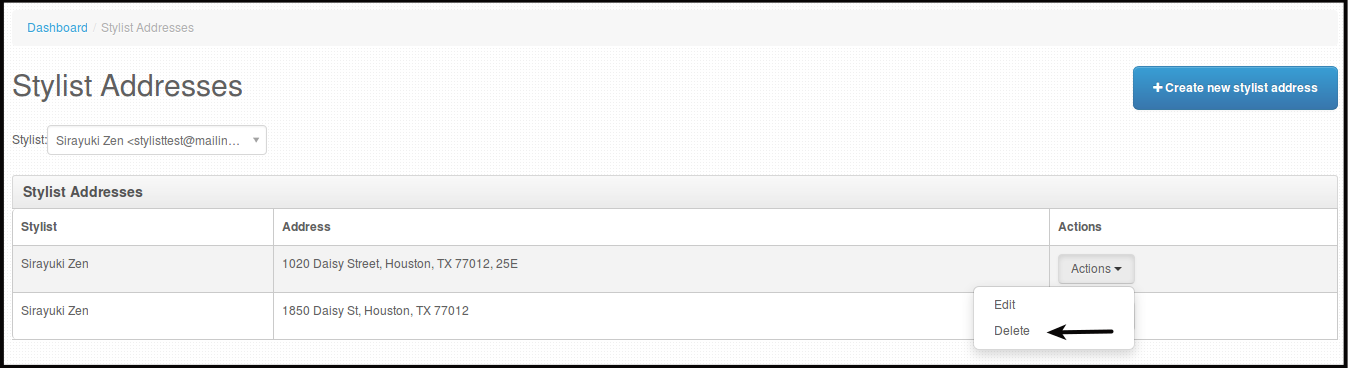
You will be directed to this page.

Or this page, whenever you will delete a stylist address that have ordered anything from the systme as a customer or appointment when that was the stylist address the system will not let you delete the address.

-
Click Delete, to permanently delete the address.
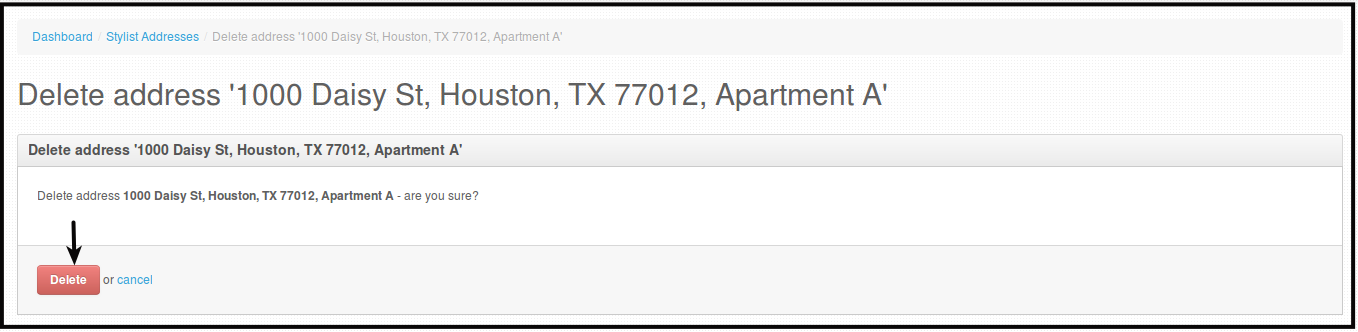
You will be directed to this page.

How to Set/Change/Edit Stylist Default Address
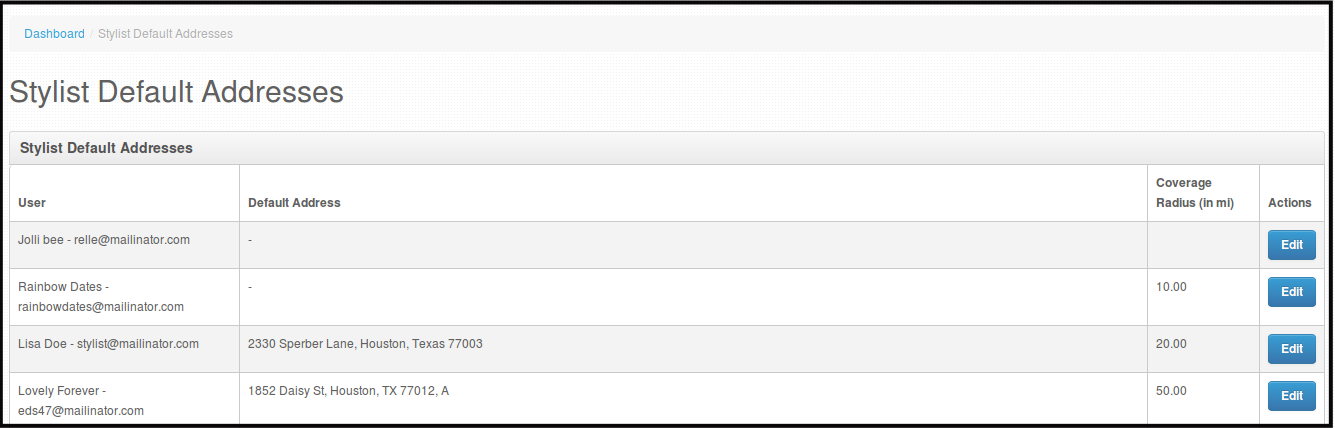
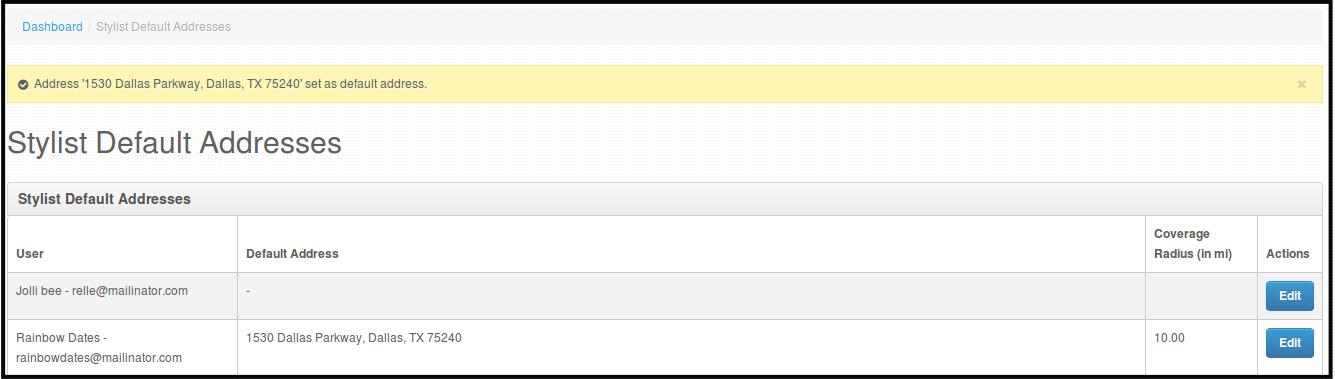
All Reviewed stylist will be on the list of Stylist Default Addresses regardless if they have a schedule or address put in on Pageboy App.
-
Click Users.
-
Click Stylist Default Addresses.

You will be directed to this page.
-
Click Edit.
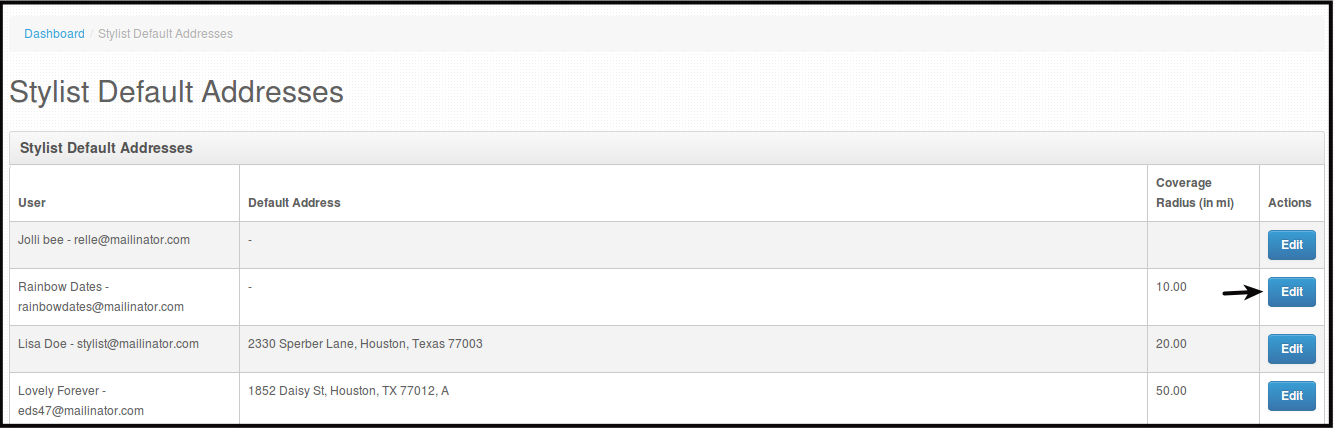
You will be directed to this page.
-
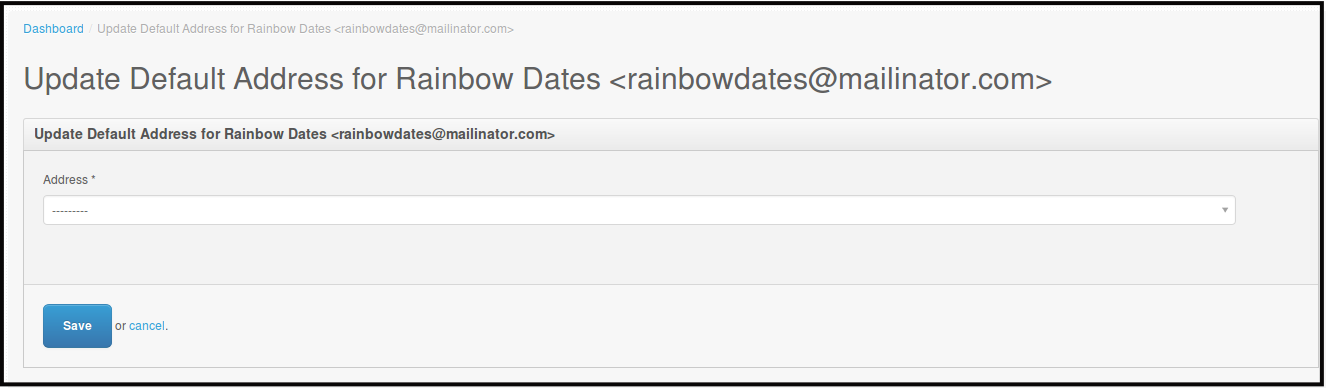
Choose from the address dropdown the address you want the stylist to have as its default address.
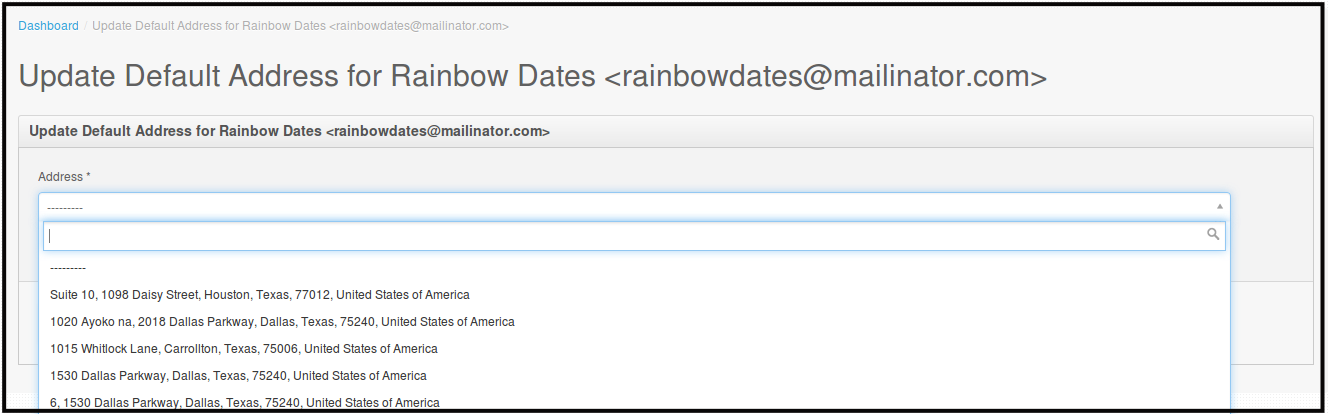
-
Click Save.

You will be directed to this page.
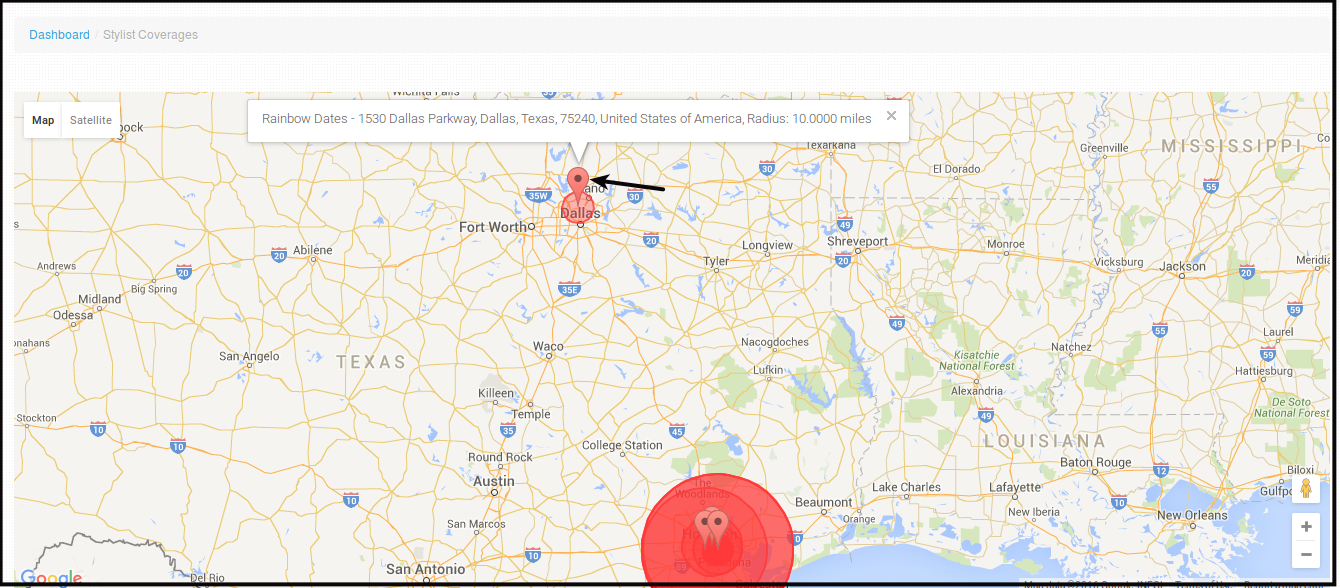
How to View Stylist Radius via Admin Web Dashboard
There are two ways on how to view Stylist Radius on Admin Web Dashboard.
-
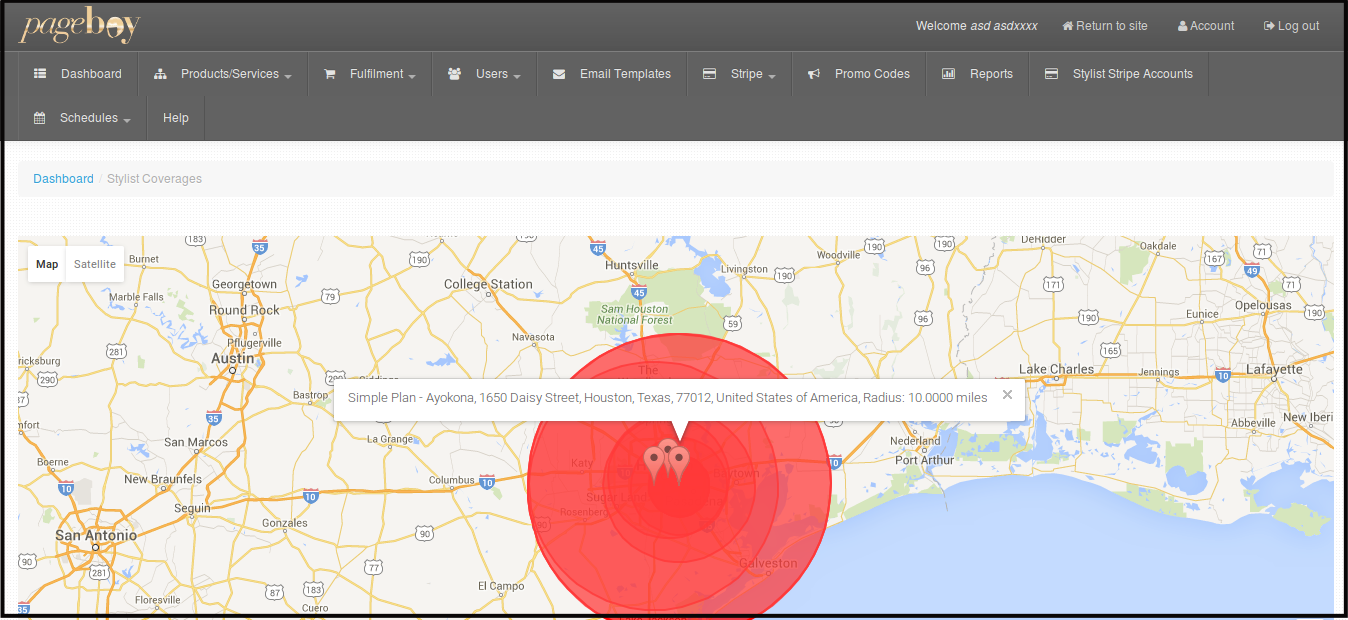
Stylist Coverage
-
Click Fulfillment.
-
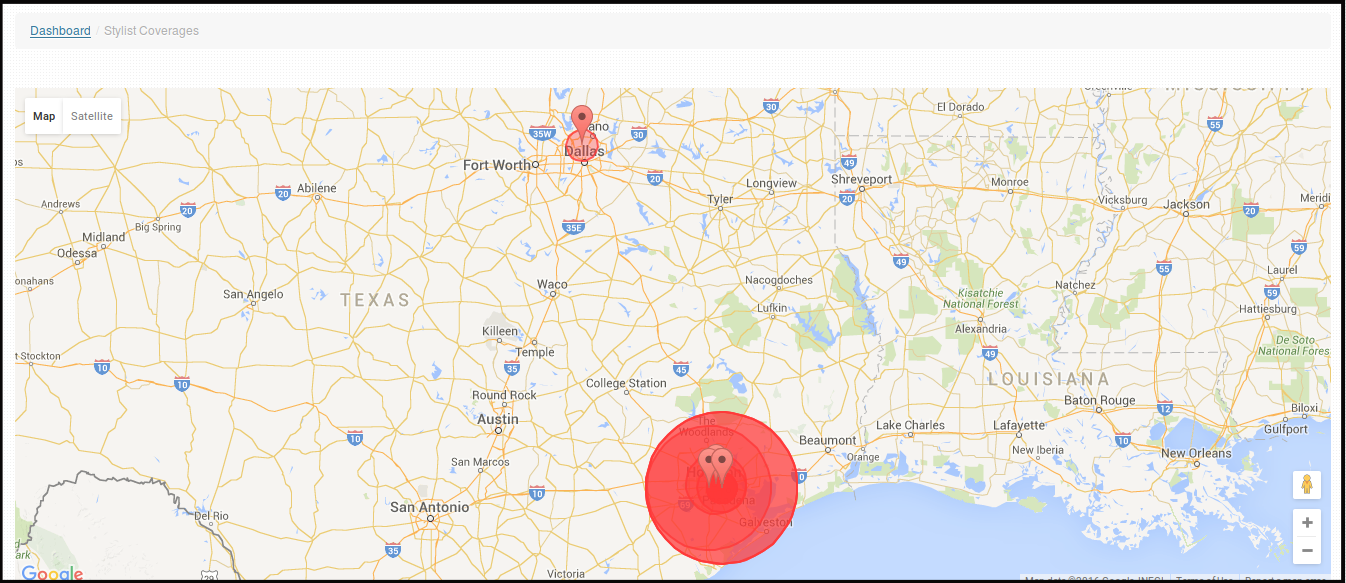
Click Stylist Coverage.
You will be directed to this page.
-
Click Location Icon, the icons represents each reviewed stylist on registered on the system, the red circle represents their raduis of coverga. By clicking te icon, you will be able to see the name of the stylist, address and radius of coverage.
-
-
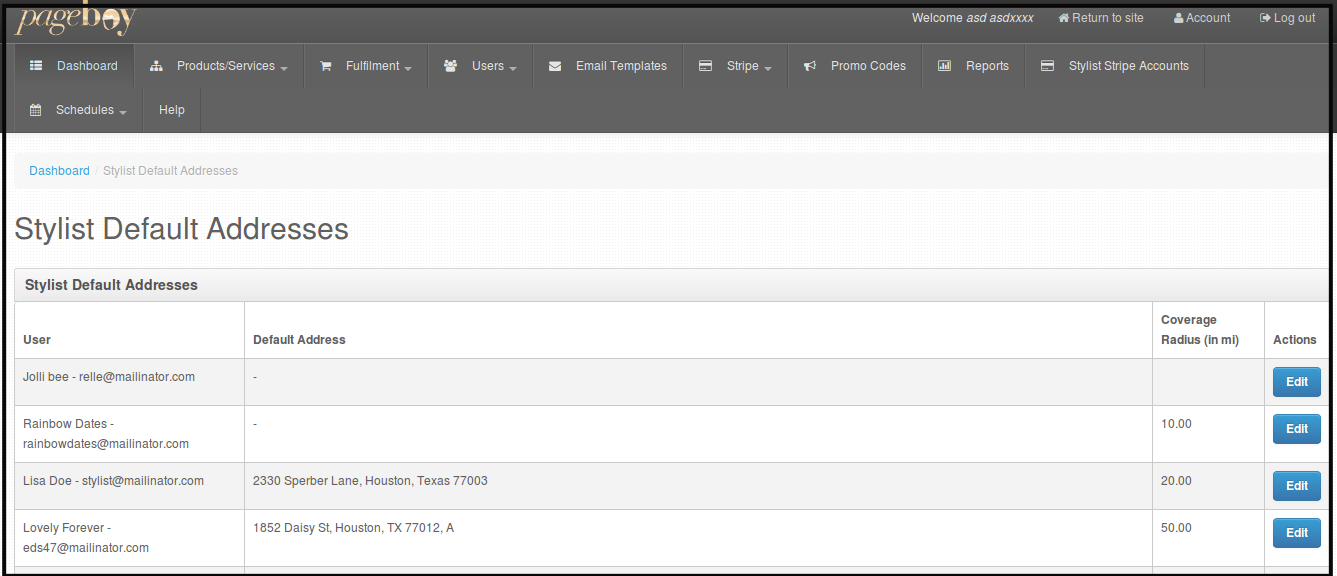
Stylist Default Addresses
-
Click Users.
-
Click Stylist Default Addresses.
You will be directed to this page.
-